Welcome to our article on understanding and wiring a well pump pressure switch. If you’re a homeowner with a well pump system, or someone interested in learning more about these essential components, you’ve come to the right place. In this article, we will explain what a well pump pressure switch is, how it works, and provide a step-by-step guide to wiring one.
Whether you’re a DIY enthusiast or simply want to understand how your well pump system operates, this article will provide you with the knowledge and tools you need. So let’s dive in and explore the world of well pump pressure switches together. This article is especially important for those searching for a well pump pressure switch wiring diagram.
Understanding the wiring process is crucial for maintaining and troubleshooting your well pump system. A well pump pressure switch is responsible for controlling the operation of your well pump, ensuring the correct water pressure is maintained. By learning how to properly wire a pressure switch, you can confidently handle any issues that may arise and potentially save on costly repairs.
So whether you’re a seasoned homeowner or a newcomer to well pump systems, read on to discover the ins and outs of well pump pressure switch wiring. Intriguing fact: Did you know that a well pump pressure switch is designed to automatically turn on and off your well pump based on the water pressure in your system? This ingenious device helps maintain consistent water pressure throughout your home, ensuring a reliable and efficient water supply.
If you’re looking for a well pump pressure switch wiring diagram, you’ve come to the right place. This article will provide you with all the information you need to properly wire your well pump pressure switch. Understanding the wiring diagram is essential for maintaining and troubleshooting your well pump system.
By following the step-by-step guide provided, you can ensure that your well pump operates correctly and avoid any potential issues. So continue reading to learn more about the well pump pressure switch wiring diagram and how it can benefit you.
If you’re looking for a detailed guide on how to wire a 4-wire well pump, check out our article “4 Wire Well Pump Wiring Diagram” for all the information you need.
The most important findings at a glance
- Well pump pressure switches are used in well systems to control water pressure.
- The process of wiring a well pump pressure switch involves steps like understanding the switch diagram, disconnecting power, identifying wires, and wiring the switch.
- Common mistakes when wiring a well pump pressure switch can lead to electrical problems, so it is important to follow professional advice for long-term maintenance.

What is a Well Pump Pressure Switch?
Unveiling the Power of Well Pump Pressure Switches Unbeknownst to many, the heart of well pump systems lies within a remarkable component known as the well pump pressure switch . This switch, with its ability to control the delicate dance of water flow, is the unsung hero of the plumbing world. There exists a myriad of pressure switch designs, each possessing its own unique qualities and advantages.
From the rugged durability of diaphragm types to the precision control of bellows varieties, finding the perfect match for your needs is within reach. But how does this humble switch work its magic? It all begins with the keen senses of pressure sensors, which detect even the slightest fluctuations in water pressure .
These sensors then deftly convert their findings into electrical signals. When the pressure reaches a predetermined threshold, the switch springs into action, granting passage to the wondrous liquid we so often take for granted. And in moments when pressure falters, the switch diligently safeguards the pump, preventing any potential harm.
One of the most remarkable qualities of the pressure switch is its unwavering commitment to maintaining consistent water pressure. With its watchful eye and deft adjustments, it ensures a seamless flow of water throughout your entire plumbing system. In essence, well pump pressure switches are the unsung heroes of water control in well pump systems.
With their versatile options and unwavering performance, they are the guardians of optimal plumbing functionality.

How Does a Well Pump Pressure Switch Work?
In the realm of water systems, well pump pressure switches reign supreme. These powerful devices hold the key to controlling water flow and upholding consistent pressure. With their sharp pressure sensors, they possess the ability to detect even the slightest fluctuations in water pressure and effortlessly translate them into powerful electrical signals.
When the pressure drops below a predetermined threshold, these switches spring into action, summoning the well pump to embark on its watery mission. However, once the pressure reaches its destined peak, the switch gracefully halts the pump’s endeavors, ensuring a harmonious equilibrium. The intricate dance between pressure changes and electrical signals is what grants these switches their remarkable speed and accuracy, enabling them to impeccably maintain the desired pressure.
But, to bask in their flawless functionality, one must master the art of wiring these switches. This delicate process entails connecting the wires from the pressure sensors to their designated terminals on the switch, ensuring a secure and steadfast bond. And, of course, a thorough double-checking of all connections is a must.
To truly conquer the realm of well pump pressure switches, one must delve deep into their inner workings. By familiarizing oneself with the correct wiring procedures, conducting regular inspections, and tending to necessary maintenance, the longevity and efficiency of these switches can be ensured. With this knowledge, one can navigate the waters of water systems with confidence and ease.
If you’re looking for a helpful guide on well pump wiring diagrams, check out our article “Well Pump Wiring Diagram” for all the information you need to get started.

A Step-by-Step Guide to Wiring a Well Pump Pressure Switch for Optimal Performance
- A well pump pressure switch is an essential component of a well water system, as it controls the operation of the pump.
- When the water pressure in the system drops below a certain level, the pressure switch signals the well pump to turn on and start pumping water.
- The pressure switch works by using an adjustable spring and a diaphragm. When the water pressure drops, the diaphragm moves, causing the switch to close and activate the pump.
- Wiring a well pump pressure switch requires a few important tools, including wire cutters, wire strippers, electrical tape, and a voltage tester.
- Before starting the wiring process, it is crucial to ensure safety by disconnecting the power to the well pump.
- Understanding the pressure switch diagram is essential for correctly identifying the different wires and terminals.
- When wiring the pressure switch, it is important to connect the power supply wires, the well pump wires, and the ground wire properly.
- After completing the wiring, it is essential to reconnect the power and test the system to ensure it is working correctly.
- Common mistakes when wiring a well pump pressure switch include improper wire connections, incorrect voltage settings, and failure to properly ground the system.
1/4 Tools Needed for Wiring a Well Pump Pressure Switch
Prepare yourself for a journey into the world of well pump pressure switch wiring, where the right tools can make all the difference. Embrace the power of the screwdriver and pliers, as they join forces to connect and secure the wires with ease. With their help, the once daunting task becomes a seamless endeavor.
But wait, there’s more! Enter the mighty electrical tape , a true hero in the realm of wire connections. Its purpose?
To safeguard against accidental disconnections and exposed wires. A simple act of wrapping the tape around the wires creates a protective fortress, ensuring their steadfastness. And what of the voltage tester, the guardian of our safety?
It stands as a crucial companion, allowing us to embark on this electrical odyssey with peace of mind. Armed with this tool, we can detect any lingering electrical currents , banishing the specter of shock and harm. In the grand tapestry of well pump pressure switch wiring, these tools shine as beacons of guidance and protection.
They not only simplify the process but also safeguard our well-being amidst the electrifying currents. So, gather your trusty companions and prepare to conquer this thrilling task with confidence and grace!
Step 1: Safety First
Safety should always be the top priority when wiring a well pump pressure switch. Begin by shutting off the power source to prevent any accidents or electrical shocks. It is also advisable to wear protective gear such as gloves and safety goggles for extra safety.
Exercise caution and adhere to proper procedures when dealing with electrical wiring. Take your time to comprehend the wiring diagram and make accurate connections. Mistakes can lead to malfunctions or harm to the well pump.
Remember, safety comes first. Identify the power source, don protective gear, and approach electrical wiring with caution. By doing so, you will ensure a secure and successful installation of your well pump pressure switch.
If you’re looking for a detailed guide on how to wire a 220 volt well pump pressure switch, check out this informative article “220 Volt Well Pump Pressure Switch Wiring Diagram” .

Common Pump Issues Troubleshooting Tabelle
| Issue | Possible Causes | Troubleshooting Steps |
|---|---|---|
| 1. Pump not starting | Incorrect wiring, faulty pressure switch, power supply issue |
|
| 2. Pump running continuously | Incorrect wiring, stuck pressure switch, water leaks |
|
| 3. Pump not turning off | Incorrect wiring, malfunctioning pressure switch, water pressure imbalance |
|
| 4. Pressure fluctuations | Incorrect wiring, pressure switch sensitivity adjustment, air or water leaks |
|
| 5. No power to pressure switch | Tripped circuit breaker, faulty electrical connection, power outage |
|
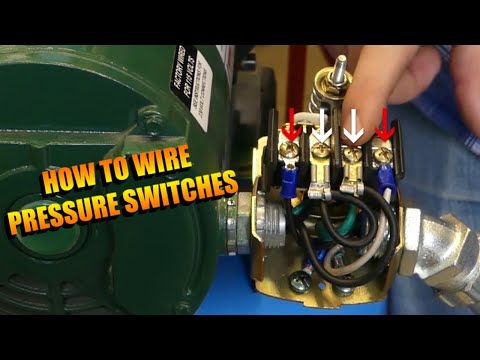
Step 2: Understanding Your Pressure Switch Diagram
Cracking the Code: Deciphering Your Pressure Switch Diagram Embarking on the task of wiring a well pump pressure switch can feel like deciphering an enigmatic code. But fear not, for the pressure switch diagram holds the key to unlocking this mystery. Within its intricate lines and symbols lie the secrets to identifying the correct terminals, making the right connections, and bringing your well pump to life.
Careful scrutiny of the diagram is paramount in your quest for wiring success. Each terminal, whether adorned with letters or numbers, serves a distinct purpose, dictating which wires must be joined together. With a discerning eye, you can discern the power source from the pump terminal, guiding your hand with precision.
But it is not just the terminals that demand your attention. The labeling and symbols adorning the diagram are equally essential to your understanding. Abbreviations and enigmatic symbols dot the landscape, representing vital components and actions.
To navigate this maze, acquaint yourself with these markers, and the path to wiring enlightenment will become clear. Yet, precision is the watchword of the pressure switch diagram. Deviation from its instructions risks confusion and malfunction.
Each wire must find its rightful home within the diagram’s confines, guided by its designated terminal. By adhering unwaveringly to this map, you can avoid the perils of faulty wiring, ensuring a safe and efficient pressure switch. Remember, my intrepid electrician, unraveling the mysteries of your pressure switch diagram is an essential step in your wiring odyssey.
Dedicate yourself to its study, unravel its secrets, and let your hands deftly bring its instructions to life. In doing so, you will bestow upon your pressure switch the gift of proper wiring, guaranteeing its flawless functionality.

Step 3: Disconnecting the Power
Safety should always be the top priority when wiring a well pump pressure switch. Start by completely disconnecting the power source. Locate the electrical panel and switch off the circuit breaker that supplies power to the pump.
For added caution, use a voltage tester to ensure the power is fully disconnected. By prioritizing safety, you can ensure a successful installation of the well pump pressure switch.
Did you know that well pump pressure switches have been used for over a century to control the water pressure in wells?

Step 4: Identifying the Wires
In the intricate task of wiring a well pump pressure switch, one must first unravel the enigma of the wires. Each color holds a secret, revealing its unique function. However, amidst this labyrinth, the ground wire emerges as the unsung hero, shielding against electrical turmoil and the jolt of shock.
Remember to mark these wires, for they may hold the key to future troubleshooting endeavors . Safety must be held in the highest regard, as the power must be tamed and caution must prevail. By delving into the depths of wire functionality, one can conquer the challenge of wiring the pressure switch and ensure its unwavering performance for many years to come.
Step 5: Wiring the Pressure Switch
In order to safely and effectively wire your well pump’s pressure switch , it is crucial to follow these steps:
1. Begin by carefully removing the insulation from the wire ends, taking care not to damage them. Each wire must be securely connected to its designated terminal.
2. To provide an added layer of protection, tightly wrap electrical tape around the wire connections.
3. It is essential to double-check the connections to ensure they are secure. Give each wire a gentle tug to ensure there are no loose connections that could lead to malfunctions or dangerous situations.
4. Always prioritize safety when working with electrical wiring. Follow proper safety procedures, wear appropriate protective gear, and exercise caution throughout the process. By following these steps and taking the necessary precautions, you can successfully and safely wire your well pump pressure switch.
Are you looking for guidance on how to wire a pressure switch for your well pump? Look no further! This video provides a step-by-step tutorial on the proper wiring diagram for a pressure switch. Learn the essentials and ensure your well pump operates smoothly.
Step 6: Reconnecting the Power and Testing
Ensuring safety is the top priority when it comes to reconnecting the power and testing your well pump. Before beginning any work, it is essential to have the proper protective gear such as gloves and safety goggles. To get started, use a voltage tester to confirm that the power has been fully restored.
This step is crucial in preventing any potential electrical shocks or damage to the well pump. By testing the voltage, you can verify that the power is flowing correctly and that there are no issues with the electrical connections. Once the power has been reconnected, it is important to conduct a thorough test of the well pump to ensure its proper functioning.
This involves checking the water flow , pressure levels , and any possible leaks or malfunctions . By performing these tests, you can identify and address any problems before they escalate into more significant issues. Remember, the well pump plays a vital role in providing a consistent water supply.
By adhering to safety protocols, using a voltage tester, and conducting comprehensive testing, you can confidently reconnect the power and ensure that your well pump operates efficiently. Always prioritize safety and seek professional assistance for major problems or if you need help with repairs or replacements. By taking the necessary precautions and maintaining your well pump, you can enjoy a reliable water supply for many years to come.

2/4 Common Mistakes When Wiring a Well Pump Pressure Switch
When it comes to wiring a well pump pressure switch , it’s crucial to be mindful of common mistakes that can lead to dysfunction and potential harm. One of the pitfalls to be wary of is incorrect wiring , which can easily be avoided by carefully adhering to the provided diagram and connecting the wires to their designated terminals. Taking the time to double-check all connections and ensure their stability can prevent future complications.
Another error to steer clear of is neglecting to properly ground the pressure switch. This oversight can result in electrical issues and damage to the switch itself. It’s essential to correctly identify and connect the ground wire to ensure proper grounding and optimal functionality.
Using the wrong wire sizes is yet another mistake that should be avoided. Inadequate wire size can lead to overheating and potential damage , especially if it’s not appropriate for the electrical load and voltage requirements of the well pump. It’s of utmost importance to choose the right wire size to prevent hazardous situations.
By sidestepping these common mistakes and adhering to proper wiring guidelines, you can guarantee that your well pump pressure switch operates smoothly and safely. If you’re uncertain or uncomfortable with the wiring process, it’s always wise to seek professional assistance .

Step-by-Step Guide: Wiring a Well Pump Pressure Switch for Optimal Performance
- Ensure your safety by wearing protective gear such as gloves and goggles.
- Familiarize yourself with the pressure switch diagram to understand the wiring process.
- Turn off the power supply to the well pump to avoid any electrical accidents.
- Identify the different wires connected to the pressure switch, such as the power, ground, and pump wires.
- Connect the wires according to the pressure switch diagram, making sure to match the correct terminals.
- Once the wiring is complete, reconnect the power supply and turn it on.
- Test the well pump by running water and checking if the pressure switch activates and deactivates the pump correctly.
3/4 Professional Advice for Long-term Maintenance
To keep your well pump pressure switch in great condition for the long haul, it’s essential to take these important steps. Regularly inspecting and maintaining the switch is key to catching any potential issues early on. Begin by carefully examining for any signs of wear or damage, such as frayed wires or loose connections.
Addressing these issues promptly is crucial to prevent further harm. Periodically test the pressure switch using a pressure gauge. If you notice any discrepancies , you may need to recalibrate or replace the switch.
While you can handle some maintenance tasks on your own, it’s always wise to consult a professional for significant repairs or replacements. Their expertise will ensure optimal functioning. By following these tips, you can prolong the life of your pressure switch and avoid costly repairs.
Remember to inspect regularly, address signs of wear or damage, and seek professional help when necessary.
4/4 CONCLUSION
In conclusion, understanding how to wire a well pump pressure switch is essential for maintaining a properly functioning well pump system. By following the step-by-step guide provided in this article, users can confidently and safely wire their pressure switch. The detailed explanation of the pressure switch diagram, identification of wires, and proper safety precautions ensures that users can complete the task without any common mistakes.
This article not only provides valuable information for wiring a well pump pressure switch, but also offers professional advice for long-term maintenance. By implementing these tips, users can ensure the longevity and efficiency of their well pump system. For further guidance on related topics, we recommend exploring our other articles on well pump maintenance and troubleshooting.
FAQ
What voltage is a well pump pressure switch?
You have the option to wire it for either 115-Volt or 230-Volt. To ensure proper operation, this switch should be used alongside a well pressure tank. It is important to set the air pressure in the well tank to 28 PSI when it is completely devoid of water, or else the switch may not function correctly.
How does a well pump pressure switch work?
The pressure switch in your home’s plumbing system uses a small diaphragm and spring mechanism to detect pressure levels and control the operation of the well pump. With the ability to adjust the cut in/off pressure settings, these switches can be customized to match the specific design of your plumbing system.
What are the 3 wires on a well pump?
In a 3-wire well pump setup, the motor is connected using four wires: black, red, yellow, and green (ground). To ensure proper functioning, three-wire pumps require a control box located outside the pump. This control box contains essential starting components and is typically mounted on a nearby wall, above the ground level.
What are the 2 wires in a well pump?
The diagrams for 2-wire well pumps are easier to comprehend and simpler to wire. In these diagrams, you connect black wires to black wires, and the green wire, which is the ground wire, is connected to the ground. Let me explain this in a way that’s easy to understand for those who may not be familiar with electrical wiring.