Welcome to our comprehensive guide on well pressure switch wiring. If you’re a homeowner who relies on a well for your water supply, understanding how to wire a well pressure switch is essential knowledge. This article will walk you through the basics of well pressure switch wiring, explain how it works, and provide a step-by-step guide to wiring it correctly.
Whether you’re a DIY enthusiast or simply want to understand the process in case of emergencies, this article is here to help. So, let’s dive in and explore the world of well pressure switch wiring. But first, did you know that a malfunctioning pressure switch is one of the most common issues homeowners face with their well water systems?
Stay tuned to learn how to troubleshoot and solve these problems like a pro. Now, let’s get started with the basics of well pressure switch wiring .
At a glance: What’s behind the topic.What you need to know: An overview of the key information
- A well pressure switch is a device used in well systems to control the water pressure.
- The switch works by sensing the pressure in the water system and turning the pump on or off accordingly.
- Wiring a well pressure switch requires certain tools and following a step-by-step process for installation.

What is a Well Pressure Switch?
In the vast world of well systems, there exists a humble yet powerful hero – the well pressure switch. With unwavering determination, this unsung protagonist ensures the steady flow of water, maintaining pressure in a harmonious balance. Like a conductor guiding an orchestra, it orchestrates the symphony of water pressure.
Within this realm, different types of well pressure switches emerge, each with its own unique purpose. With their keen senses, they detect even the slightest variations in water pressure and spring into action, activating or deactivating the pump with precision. At the heart of this remarkable device lies its primary mission – to uphold the sanctity of water pressure.
When the pressure falters, the switch springs to life, urging the pump to restore it to its rightful glory. And when the pressure soars to dangerous heights, the switch takes charge, graciously silencing the pump to avert catastrophe. How do these switches achieve such extraordinary feats, you may wonder?
Through the mastery of a delicate diaphragm , they perceive the ever-shifting tides of pressure and skillfully manipulate the flow of electricity to the pump. It is through this intricate dance that optimal water pressure is maintained, ensuring a constant and reliable supply for the homeowners who depend on it. Therefore, it is imperative for those who dwell in the realm of well systems to understand the nuances of these switches.
By selecting the right switch and expertly wiring it, they unlock the gateway to a realm of uninterrupted water supply. As the curtain rises on this grand performance, the well pressure switch takes center stage, captivating audiences with its unwavering dedication to the art of water pressure maintenance.
If you’re looking for a detailed guide on how to wire a 4-wire well pump, check out this informative article on 4 wire well pump wiring diagram .
How Does a Well Pressure Switch Work?
In the realm of well systems, a humble yet crucial device reigns supreme: the well pressure switch. This unassuming contraption, equipped with a diaphragm, possesses the remarkable ability to perceive fluctuations in pressure. In doing so, it orchestrates a delicate dance, activating the pump with a graceful flick when the thirst of water becomes insatiable.
Yet, as the pressure reaches its pinnacle, this switch, like a vigilant guardian, swiftly halts the pump’s tireless efforts, shielding the system from the perils of over-pressurization. Without this unassuming hero, the pump would tirelessly toil, draining energy and inviting the specter of wear and tear. Thus, the pressure switch emerges as the unsung hero, standing as a stalwart sentinel, ensuring an unwavering water supply and unrivaled system efficiency.
If you’re looking for step-by-step instructions on how to wire your well pump pressure switch, check out our article on well pump pressure switch wiring for all the details you need.

Troubleshooting Tabelle for Common Water Pressure Issues
| Problem | Possible Causes | Troubleshooting Instructions | Recommended Solutions |
|---|---|---|---|
| Low water pressure | 1. Clogged water filter 2. Faulty pressure switch 3. Leaking pipe |
1. Check and clean the water filter to remove any debris or sediment that may be blocking the flow 2. Test the pressure switch with a multimeter to determine if it is functioning properly 3. Inspect the pipes for any leaks and repair them as necessary |
1. Replace or clean the water filter to ensure optimal water flow 2. Replace the faulty pressure switch if it is not functioning correctly 3. Fix any pipe leaks to prevent water loss and improve pressure |
| No water flow | 1. Power outage 2. Faulty pressure switch 3. Pump failure |
1. Check the power supply to ensure it is not interrupted and restore power if necessary 2. Test the pressure switch with a multimeter to determine if it is faulty and needs replacement 3. Inspect the pump for any issues such as a malfunctioning motor or clogged impeller |
1. Restore the power supply if there was an outage to resume water flow 2. Replace the faulty pressure switch to ensure proper operation 3. Repair or replace the pump if it is no longer functioning correctly |
| Frequent cycling | 1. Incorrect pressure settings 2. Waterlogged pressure tank 3. Defective pressure switch |
1. Adjust the pressure settings to the recommended levels to prevent excessive cycling 2. Drain and recharge the pressure tank to remove excess water and restore proper function 3. Test the pressure switch with a multimeter to determine if it is defective and needs replacement |
1. Set the pressure settings correctly to prevent frequent cycling and potential system damage 2. Ensure the pressure tank is functioning properly and not causing issues 3. Replace the defective pressure switch to maintain consistent pressure control |
1/3 Essential Tools for Wiring a Well Pressure Switch
When it comes to installing a well pressure switch, having the right tools is crucial for success. Make sure to choose a compatible switch for your system. Proper wire strippers are essential for clean and accurate connections, preventing future electrical issues.
Another important tool for the installation is a voltage tester . It ensures your safety by confirming the absence of electricity before you begin any work. This protects you from potential shocks or hazards.
To ensure a smooth and safe wiring process, make sure you have the right well pressure switch, wire strippers, and a voltage tester. These tools will help you make accurate connections and ensure your safety. Remember, always prioritize safety by using the appropriate tools and taking necessary precautions.
Step 1: Safety Precautions
Safety should always be your top priority when wiring a well pressure switch. Here are some important precautions to keep in mind:
1. Prioritize your safety by wearing protective gloves to protect against injuries and electrical shocks throughout the entire wiring process.
2. Before you begin, it is crucial to completely turn off the power. This includes switching off the well pump and disconnecting any backup generators. Double-check for any remaining electricity using an electrical tester.
3. To be prepared for any potential electrical fires, keep a fire extinguisher nearby during the process. By adhering to these safety precautions , you can ensure a smooth and secure wiring process for your well pressure switch. Never compromise on safety when working with electricity.
Did you know that well pressure switches have been used for over a century to control water flow in wells?

Step 2: Disconnecting the Power
In the pursuit of wiring your well pressure switch, it is of utmost importance to first sever the connection to the power supply. This crucial step will shield you from the perils of electrical shock or any unforeseen mishaps. Allow me to guide you through the necessary precautions:
1. Begin by locating the primary switch governing the power supply of your well system. Typically, this switch resides within the control panel or in close proximity to the well pump.
By deactivating this switch, you effectively sever the power flow, ensuring complete disconnection.
2. Take a moment to inspect for any auxiliary generators or alternative power sources that may be linked to your well system. Disconnecting these additional sources serves as a preventative measure against potential hazards that may arise.
3. To guarantee absolute certainty that no electrical current courses through the system, employ an electrical tester. Adhere to the instructions accompanying the tester to examine the wires thoroughly and verify the absence of electricity. By meticulously adhering to these steps and ensuring the power supply is entirely cut off, you may confidently proceed with the wiring of your well pressure switch.
Always remember, prioritizing safety is paramount when working with electrical components.

Step 3: Removing the Old Pressure Switch
Begin your journey into the realm of mechanics by embarking on the task of removing the ancient pressure switch. In order to ensure your safety, it is imperative to disconnect the wiring connections, severing any lingering power. With utmost delicacy, detach the wires, navigating through the labyrinth of potential damage.
Turn your attention to the screws or bolts standing guard, steadfastly holding the old switch in place. Armed with the appropriate tools, dismantle these defenders, liberating the switch from its stagnant position. As you prepare to bid farewell to the old pressure switch, exercise caution when detaching it from the water line, for the fragile ecosystem of surrounding components must remain unscathed.
Time is of the essence, so proceed with a gentle touch, avoiding any unnecessary havoc. Remember, safety should always be at the forefront of your mind, thus donning protective gloves is paramount. With the old pressure switch now a thing of the past, rejoice in the knowledge that you have triumphed over its reign.
However, your journey is far from over, as the installation and wiring of the new switch beckon you towards the next chapter. Await the forthcoming section, eager to uncover the secrets of its proper placement and configuration.
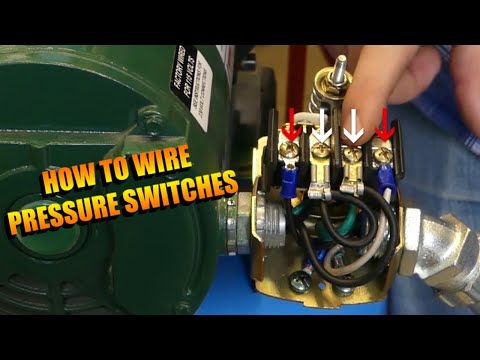
In this article, we will explore the topic of well pressure switch wiring. To help you understand the process better, we have selected a video titled “How to Wire a Pressure Switch”. Watch the video to learn step-by-step instructions on properly wiring a pressure switch for your well system.
Step 4: Installing the New Pressure Switch
Ensuring the seamless operation of your well system is of utmost importance, and the installation of a new pressure switch plays a pivotal role in achieving this goal. Before embarking on this task, it is essential to ascertain the compatibility of the switch with your system to preempt any potential complications down the line. Once you have confirmed the suitability of the switch, it is imperative to affix it firmly in place by employing screws or bolts.
This measure ensures that the switch remains steadfast even during the most arduous of operations. Subsequently, exercise utmost caution as you reconnect the wiring, for any missteps in this process can lead to malfunctions or irreparable damage. Take care to secure all connections and eliminate any loose wires that may compromise the system’s functionality.
Upon completing the installation , put the switch to the test by reinstating the power and observing its response. Watch closely as it activates the pump when the pressure drops and promptly shuts it off once the desired level is attained. By adhering to these steps, you pave the way for a successful installation.
Remember, prioritizing safety is paramount, and if necessary, do not hesitate to seek professional assistance.
If you’re looking for a visual guide on how to wire a well pump pressure switch, check out this helpful article “Well Pump Pressure Switch Wiring Diagram” .

Step 5: Wiring the Pressure Switch
Crafting a secure connection when wiring a well pressure switch is of utmost importance. Begin by firmly attaching the wires to the appropriate terminals on the switch. Then, put the switch to the test by activating the power and observing if it triggers the pump when the water pressure diminishes.
Additionally, confirm that the switch deactivates the pump once the desired pressure level is reached. Taking the time to test the pressure switch is vital, as it allows for the detection of potential problems before they escalate. By implementing proper wiring techniques and conducting thorough testing, your well system will operate reliably and efficiently.
If you lack confidence or expertise in wiring, it is advisable to enlist the help of a licensed electrician. Their knowledge and skill in handling intricate wiring ensure both the functionality and safety of your well system.
By the way, if you’re interested in learning more about wiring a well pump, check out this helpful guide on How to Wire a Well Pump that breaks down the process step by step.
How to Properly Wire a Well Pressure Switch: A Step-by-Step Guide
- Ensure safety precautions are taken before starting the wiring process.
- Disconnect the power to the well pump.
- Remove the old pressure switch from the well system.
- Install the new pressure switch in the appropriate location.
- Wire the pressure switch according to the manufacturer’s instructions.
- Test the wiring connections to ensure they are secure.
- Reconnect the power to the well pump.
- Check the functionality of the pressure switch to ensure it is working properly.
Understanding Pressure Switch Problems
Navigating the Troubles of Pressure Switches In the realm of pressure switch problems, fret not, for I am here to guide you. Let us delve into the telltale signs and underlying causes, empowering you to troubleshoot and rectify these issues like a seasoned pro. To begin, inconsistent water pressure serves as a glaring indicator of pressure switch troubles.
If you find yourself grappling with fluctuating or feeble water pressure, chances are your pressure switch is misbehaving. Another cause for concern is a perpetually running pump, even when water is not required. This indicates a possible malfunction in the pressure switch, as it fails to halt the pump once the desired pressure is attained.
Conversely, if the pump fails to activate when water is needed, it may be a result of the pressure switch’s inability to detect the drop in water pressure. Now, let us delve into the causes. Pressure switch malfunctions can stem from a defective switch, a worn-out diaphragm, or loose/damaged wiring connections.
To troubleshoot, inspect the wiring for any signs of damage or looseness, assess the power supply voltage, and examine the diaphragm for wear or impairment. Should you find yourself unable to rectify the issue independently, it is time to summon the expertise of professionals. A licensed electrician possesses the skills to diagnose and resolve intricate wiring problems, guaranteeing the safe and efficient functioning of your pressure switch.
Always remember, when dealing with electrical systems, it is better to err on the side of caution. By comprehending the signs, causes, and steps to troubleshoot pressure switch problems, you will possess the knowledge necessary to tackle any challenges that may arise, ensuring the seamless operation of your water system.
Troubleshooting Your Pressure Switch Wiring
Embarking on the journey to troubleshoot your pressure switch wiring requires a careful and meticulous approach. Begin by conducting a thorough examination of the wiring connections, ensuring they are tightly secured and free from any damage. To further unravel the mysteries that lie within, equip yourself with a voltage tester to gauge the power supply’s efficiency.
Its readings will reveal whether the voltage resides within the realm of proper functionality. Should the numbers dare to deviate, it is wise to forfeit your solitary quest and seek the guidance of a seasoned professional. Lastly, turn your discerning gaze towards the diaphragm, a delicate instrument responsible for detecting the ebb and flow of pressure.
A discernible tear, a subtle crack, or any visible signs of damage may signify its inability to function harmoniously. Should this be the case, do not hesitate to replace the impaired diaphragm, ensuring that the pressure switch can fulfill its destined purpose. By diligently adhering to these guiding principles, you shall conquer the enigmas that plague your pressure switch wiring.
However, should any doubts or uncertainties cloud your path, it is always prudent to summon the aid of those well-versed in the art of professional assistance .

Understanding the Basics of Well Pressure Switch Wiring
- A well pressure switch is an essential component of a well water system that controls the operation of the pump.
- This switch is responsible for monitoring the water pressure in the system and turning the pump on and off accordingly.
- Well pressure switches are typically located near the pressure tank and are connected to both the power supply and the pump.
- When the water pressure drops below a certain level, the pressure switch activates the pump, allowing it to draw more water into the system.
- Conversely, when the water pressure reaches a certain maximum level, the pressure switch shuts off the pump to prevent over-pressurization.
- Wiring a well pressure switch requires a few essential tools, such as wire cutters, wire strippers, and a screwdriver.
2/3 Professional Help: When to Seek It
When it comes to the intricacies of well pressure switch wiring, it is imperative to enlist the aid of a professional in select circumstances. Should you encounter persistent problems or inconsistent water pressure, it may be indicative of more complex wiring issues that necessitate the expertise of an expert. Working with electrical components can be perilous if not executed meticulously, which is why it is crucial to reach out to a licensed electrician.
Their extensive knowledge and experience enable them to handle the wiring with utmost safety and compliance with electrical codes. If you find yourself grappling with troubleshooting problems related to your pressure switch, seeking professional assistance is a wise course of action. A licensed electrician can meticulously diagnose and rectify any issues by examining the wiring connections, conducting tests on the power supply voltage, and inspecting for any signs of damage or wear on the diaphragm.
To summarize, when confronted with recurring issues or intricate wiring problems concerning your well pressure switch, it is highly recommended to contact a licensed electrician. They will ensure the wiring is executed securely and accurately, and possess the ability to troubleshoot any problems you may encounter. Always remember, prioritizing safety is paramount when working with electricity.
3/3 CONCLUSION
In conclusion, understanding the basics of a well pressure switch and knowing how to properly wire it can be essential for maintaining a functional water system. By following the step-by-step guide provided in this article, readers can confidently wire a well pressure switch and troubleshoot any potential problems that may arise. This article has provided valuable information and tips for both beginners and experienced individuals, ensuring that users can successfully complete this task.
For those who may need additional assistance or encounter more complex issues, it is recommended to seek professional help. We hope that this article has been helpful, and we encourage readers to explore our other articles on related topics to further expand their knowledge and skills in this area.
FAQ
What are the 3 wires on a well pump?
In a 3-wire well pump setup, the motor is linked through a set of wires: black, red, yellow, and green (ground). This particular configuration involves a separate control box located outside the pump. The control box is responsible for housing the essential starting components of the pump. Typically, you can find the control box mounted on a nearby wall at an elevated position above the ground.
What voltage is a well pressure switch?
This switch is designed specifically for submersible well or jet pumps. It offers the flexibility to be wired for either 115-Volt or 230-Volt power supply. It is important to note that this switch should always be used in combination with a well pressure tank. To ensure proper operation, the air pressure inside the well tank, when completely drained of water, should be set at 28 PSI. Failing to set the air pressure to this level may result in the switch not functioning correctly.
Should well pressure switch be open or closed?
A well pump switch is a type of electrical switch used to control the operation of a well pump. It is designed with two pairs of contacts, making it a double pole switch. When the switch is in its default position, it completes the circuit and allows the flow of electricity, powering the well pump. This configuration is known as normally closed, meaning that the switch is closed and the circuit is connected in its default state. The switch is responsible for controlling the flow of 240-volt power through the black wires, which connect to the load (such as the red wires).
How does well pressure switch work?
A pressure switch is a mechanical device typically located at the tank tee of the pressure tank. It is responsible for detecting pressure changes in your home’s plumbing system. This switch incorporates a small diaphragm and spring mechanism that triggers the well pump to turn on or off based on the pressure readings. In simple terms, the pressure switch acts as a control mechanism for your well pump, ensuring that it operates efficiently and only when necessary. It helps maintain the right water pressure in your plumbing system by automatically regulating the pump’s activation. This not only saves energy but also prevents potential damage caused by excessive pressure.