Are you dealing with a frustrating toilet leaking between tank and bowl ? Don’t worry, you’re not alone. Many homeowners have encountered this common plumbing issue, toilet leaking between tank and bowl, and it can be a nuisance if not addressed promptly.
In this article, we will guide you through the steps to fix a leaking toilet tank, as well as troubleshoot other possible issues that may be causing the toilet leaking between tank and bowl. Whether you’re a DIY enthusiast or simply want to understand the problem better before seeking professional help, this article provides valuable insights and solutions for toilet leaking between tank and bowl. So, if you’re tired of that constant drip and want to regain a fully functioning toilet, keep reading.
You’ll be surprised at how easily this problem, toilet leaking between tank and bowl, can be resolved . Let’s dive in and get your toilet back in working order .
If you’re struggling with a toilet tank that leaks at the bolts, check out our article “Toilet Tank Leaks at Bolts” for helpful tips on fixing the issue and preventing future leaks.
In three sentences: The essentials in a nutshell
- Understanding the Problem: Leak Between Toilet Tank and Bowl – Common causes of leaks in toilets – Signs to look for if your toilet is leaking
- Steps to Fix a Leaking Toilet Tank – Identifying the source of the leak – Necessary tools and equipment needed for the repair – Steps to shut off the water supply, drain the tank, and replace the tank-to-bowl gasket
- Troubleshooting Other Possible Issues – Identifying and fixing a leak due to a damaged flapper – Identifying and fixing a leak due to a faulty fill valve
- Preventive Measures to Avoid Toilet Leaks – Regular maintenance of your toilet – Knowing when to seek professional help for more complicated issues.

1/12 Common Causes of Leaks
In the world of plumbing, a leaking toilet tank is a common nuisance that can cause frustration and water damage. While there are a few potential causes for this issue, such as improper installation or age, one of the most common culprits is a faulty tank-to-bowl gasket . This small yet crucial component can deteriorate over time, allowing water to seep out and create a pool around the base of the toilet.
Excessive tightening of the tank bolts can also put unnecessary pressure on the gasket, leading to its failure. If you find yourself facing this pesky problem, fear not, for there is a solution. The first step is to identify the source of the leak and turn off the water supply.
With a trusty wrench and screwdriver in hand, you can then proceed to properly align the tank and bowl, ensuring they are in perfect harmony. The next crucial step is to replace the worn-out gasket with a shiny new one, providing a tight seal that will keep those unwanted leaks at bay. Finally, it’s time to reassemble the toilet, putting all the pieces back together like a well-choreographed dance.
To prevent future leaks, it’s important to perform regular maintenance on your toilet. Take the time to check the flapper and fill valve for any signs of damage or wear, and replace them if necessary. By staying on top of these small tasks, you can save yourself from the headache of dealing with a leaking toilet tank in the future.
However, if you find that the problem persists or becomes more complex, it may be best to seek the assistance of a professional plumber. With their expertise and know-how, they can tackle any plumbing issue with ease, ensuring that your toilet remains leak-free and your sanity intact. Remember, a leaking toilet tank may seem like a minor inconvenience, but it’s important to address the issue promptly to prevent further damage and wasted water.
So, roll up your sleeves, grab your tools, and embark on a mission to conquer that leak. Your toilet will thank you, and you can enjoy a bathroom experience free from the annoyance of unwanted puddles.

2/12 Signs Your Toilet is Leaking
Is your toilet trying to communicate with you? It may be sending you secret messages about a leak. But how can you decipher its hidden code?
Here are some clues to help you crack the case. First, listen closely. If you hear unusual sounds, like gurgling or hissing , coming from the toilet tank, it’s a red flag .
Your toilet could be leaking and desperately trying to grab your attention. Next, keep an eye on the base of the toilet. If you notice water pooling around it, that’s another sign of a leak.
Don’t brush it off, as it could lead to more serious issues down the line. Lastly, pay attention to the water in the toilet bowl. Is it constantly running, even when you’re not using it?
This is a clear indicator of a leak that needs immediate fixing. So, if your toilet is making strange noises, has water pooling around it, or has water consistently flowing into the bowl, it’s time to take action. Don’t ignore these leaks.
Grab your trusty toolbox and prepare to tackle the problem. Your toilet and your wallet will be forever grateful.
3/12 Step 1: Identifying the Source of the Leak
To remedy a leaking toilet tank, one must first identify the origin of the leak. Here are the vital areas to examine:
1. Water Supply Connection: Examine the connection for any signs of dripping or pooling water. If a leak is detected, either tighten the connection or replace the faulty components.
2. Flush Valve Assembly: Carefully inspect the flush valve assembly for cracks or deterioration. Should any issues arise, such as a cracked valve, it may be necessary to acquire a replacement.
3. Tank Bolts and Washers: Thoroughly scrutinize the tank bolts and washers for signs of corrosion or damage. Loose or damaged bolts and washers have the potential to cause leaks. Tighten or replace them as necessary.
Through a meticulous examination of these areas, the source of the leak can be identified, enabling one to undertake the necessary measures for rectification. Prior to commencing any repairs, it is imperative to deactivate the water supply to prevent further harm.
If you’re having issues with your toilet leaking between the tank and bowl, check out our article “Toilet Leaks Between Tank and Bowl” to learn how to fix this common problem and prevent future leaks.

Did you know that a leaking toilet can waste up to 200 gallons of water per day? That’s equivalent to flushing your toilet over 20 times!

4/12 Step 2: Necessary Tools and Equipment
Before embarking on the noble quest of vanquishing the leak that plagues your noble toilet tank, it is of utmost importance to arm oneself with the tools and equipment required for this arduous task. A trusty wrench and screwdriver, the stalwart companions of any handyman, shall be your loyal allies in this endeavor. Yet, dear reader, do not underestimate the power of a humble gasket, for it holds the key to sealing the tumultuous bond between tank and bowl.
Procure a new tank-to-bowl gasket, for it shall be the beacon of hope amidst the watery chaos. As you embark upon this valiant repair, be sure to have a vessel at the ready, be it a bucket or a towel, to capture any unruly droplets that may attempt to escape their aquatic prison. By doing so, you shall tame the tempestuous waters and prevent the spread of chaos within your realm.
Remember, dear reader, that meticulous preparation is the foundation upon which triumph is built. Equip yourself with the necessary tools and equipment, for they shall be your stalwart companions in this noble pursuit. With them by your side, you shall be well-prepared to conquer the treacherous path that lies ahead and emerge victorious in your quest to mend the leaking toilet tank .
If you’re struggling with a leaking toilet, check out our article on how to replace a tank to bowl gasket for step-by-step instructions and tips to fix the issue.
5/12 Step 3: Shutting Off the Water Supply
To ensure a smooth repair and avoid any mishaps, it is essential to first turn off the water supply before fixing a leaking toilet tank. This simple step prevents water from flowing into the tank while you work, eliminating the risk of accidental flushing. You can easily do this by using the valve near the toilet or by shutting off the main water supply to your house.
Neglecting to shut off the water properly not only makes the repair process more challenging but also puts your bathroom at risk of damage. So, remember to always prioritize shutting off the water supply before embarking on any repairs to keep things clean and hassle-free.

Comparison of Gasket Types: Tabelle
| Type of Gasket | Durability | Installation Difficulty | Cost | Compatibility | Common Issues | Maintenance Required | Expert Recommendation |
|---|---|---|---|---|---|---|---|
| Rubber | Long-lasting and durable | Easy | Affordable | Compatible with most toilet models | Prone to cracking if not properly maintained | Regular cleaning and inspection | Expert recommended for its durability and compatibility |
| Sponge | Less durable compared to rubber | Moderate | Affordable | Compatible with select toilet models | May have difficulty sealing properly | Periodic replacement recommended | Considered as an alternative option |
| Wax | Durable and provides a tight seal | Difficult | Relatively expensive | Compatible with most toilet models | May melt or become misshapen in high temperatures | Periodic replacement and resealing required | Expert recommended for its sealing capabilities |
| Foam | Less durable than rubber | Easy | Affordable | Compatible with most toilet models | May compress over time, reducing effectiveness | Regular cleaning and inspection | Recommended for its ease of installation |
| EPDM | High durability and resistance to chemicals | Moderate | Relatively expensive | Compatible with most toilet models | Prone to degradation in UV light exposure | Periodic cleaning and inspection | Expert recommended for its chemical resistance |
| Silicone | Long-lasting and resistant to high temperatures | Easy | Relatively expensive | Compatible with most toilet models | May require additional adhesive for proper installation | Regular cleaning and inspection | Recommended for its high-temperature resistance |
6/12 Step 4: Draining the Tank
To successfully repair a leak between the toilet tank and bowl, it is crucial to drain the tank first. Begin by disconnecting the water supply line and ensuring there is no water flow. Wipe away any remaining water with a sponge or towel, taking care to clean every nook and cranny.
Stay vigilant of any sharp edges or protruding parts to prevent harm or further damage. By thoroughly draining the tank, you can work on fixing the leak without any water hindrance. Always remember to disconnect the water supply line, eliminate the water, and remain cautious of sharp edges.
Follow these steps diligently, and the leak will be resolved.
7/12 Step 5: Replacing the Tank-to-Bowl Gasket
In the world of bathroom repair, there is a task that demands both precision and patience: fixing a leaking toilet tank . This delicate operation requires the replacement of the tank-to-bowl gasket, a crucial component for achieving a secure and watertight connection . But before you embark on this journey, dear reader, remember to properly align the tank and bowl.
And once the gasket is in place, tighten the tank bolts with a torque wrench, following the recommended specifications. To further fortify the seal and bid farewell to water leakage, apply a generous amount of plumber’s silicone grease to the gasket. Remember, my dear reader, to take your time and embrace the art of paying attention to detail.
For it is through these careful gestures that you shall conquer the leak and restore your toilet’s rightful functionality once more.
If you’re having issues with your toilet tank losing water, check out our article on how to fix a toilet tank that’s losing water for helpful tips and solutions.
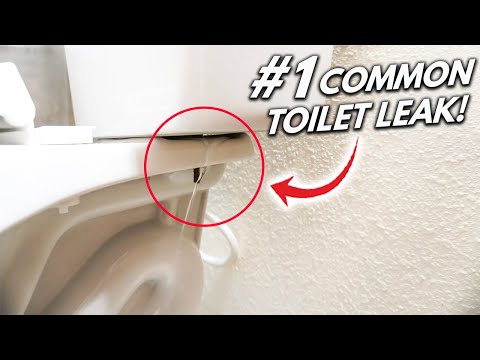
Is your toilet leaking between the tank and bowl? Don’t worry, we’ve got you covered! In this DIY video, you’ll learn how to fix the #1 hidden toilet leak. Say goodbye to wasted water and high water bills. Watch now to save money and prevent further damage.
8/12 Step 6: Reassembling the Toilet
Assembling your toilet requires precise alignment of the tank and bowl to prevent any unwelcome leaks. Take extra care to ensure that the bolt holes are properly aligned once you have replaced the gasket. Using a torque wrench, tighten the tank bolts according to the recommended specifications.
However, exercise caution and avoid overtightening , as this could potentially harm the toilet. To further safeguard against leaks, apply a thin layer of plumber’s silicone grease to the gasket. This will enhance the seal between the tank and bowl, providing added protection.
By diligently following these steps, you can ensure a pristine and fully functional toilet, free from any leaks. Remember to exercise caution and adhere to the recommended guidelines throughout the process.

9/12 Leak Due to a Damaged Flapper
A malfunctioning toilet can be the result of a faulty flapper. Indications of a damaged flapper include a continuous flow of water into the toilet bowl and strange noises emanating from the tank. If you suspect a damaged flapper, remedy the situation by turning off the water supply, emptying the tank, and detaching the old flapper.
Acquire a suitable replacement at your nearby hardware store and affix it to the flush valve. Regularly inspect and maintain your flapper to prevent leaks and potential water harm. Stay vigilant for any signs of a damaged flapper and take necessary measures to ensure the optimal condition of your toilet.
Fixing a Toilet Leak Between the Tank and Bowl: A Step-by-Step Guide
- Identify the source of the leak between the toilet tank and bowl.
- Gather the necessary tools and equipment, including a wrench and a new tank-to-bowl gasket.
- Shut off the water supply to the toilet.
- Drain the tank by flushing the toilet and holding down the handle until the tank is empty.
- Replace the tank-to-bowl gasket by removing the old one and installing the new one securely.
10/12 Leak Due to a Faulty Fill Valve
Is your toilet leaking ? Keep an eye out for these signs: water constantly flowing into the bowl, weak flushing, and strange noises from the tank. To fix it, turn off the water, empty the tank, disconnect the supply line, and replace the faulty fill valve .
Follow the instructions carefully. Once done, turn the water back on and check for leaks. Remember, regular maintenance is key to preventing leaks.
Clean the valve, remove any debris, and adjust the water level. Taking care of your toilet will save you money and help conserve water.
11/12 Maintaining Your Toilet Regularly
Maintaining your toilet is essential for its longevity and preventing leaks. One crucial task is to inspect the tank-to-bowl gasket for any signs of wear or damage. Replacing the gasket at the first sign of trouble can prevent further issues.
Cleaning the flush valve assembly is also vital. Over time, mineral deposits and debris can accumulate, leading to clogs and leaks. Regularly cleaning the flush valve will keep your toilet running smoothly and prevent these problems.
Checking and tightening the tank bolts is another important maintenance step. Loose bolts can cause leaks between the tank and bowl. By regularly ensuring their tightness, you can avoid leaks and maintain a secure connection.
By consistently inspecting the gasket, cleaning the flush valve, and checking the tank bolts, you can effectively maintain your toilet and prevent leaks . These simple maintenance tasks will save you from expensive repairs and prolong the life of your toilet. Remember to include them in your regular maintenance routine.

Fixing a Leaking Toilet Tank: Quick and Easy Steps
- Leaking toilets can be a common household problem, but understanding the causes and signs of a leak can help you fix it quickly.
- Common causes of leaks between the toilet tank and bowl include a worn-out tank-to-bowl gasket, a damaged flapper, or a faulty fill valve.
- Signs that your toilet is leaking include water pooling around the base, a constantly running toilet, or a noticeable decrease in water levels in the tank.
- To fix a leaking toilet tank, you’ll need some essential tools and equipment, such as an adjustable wrench, a sponge, a bucket, and a new tank-to-bowl gasket.
- The first step in fixing the leak is identifying the source, which can be done by inspecting the tank, bowl, and gasket for any visible damage or wear.
- Once you’ve identified the source, you’ll need to shut off the water supply to the toilet and drain the tank by flushing it and absorbing any remaining water with a sponge.
12/12 When to Seek Professional Help
When it comes to those pesky toilet leaks, sometimes a DIY fix just won’t cut it. Knowing when to call in the pros is crucial. Here are a few signs that it’s time to dial up a professional plumber:
1. Stubborn Leaks: If you’ve tried every trick in the book to fix a leak, but it just keeps coming back, there’s likely a deeper issue at play. A seasoned plumber can get to the root of the problem and provide a long-lasting solution.
2. Tricky Leaks: Not all leaks are created equal. If you’re dealing with water pooling around the base, strange noises emanating from the tank, or water flowing non-stop no matter what you do, it’s time to bring in the experts. Plumbers have the know-how and tools to tackle even the most complex leaks and prevent further damage.
3. Time and Convenience: Let’s face it, life can get busy. If you’re short on time or lack the necessary tools and skills to tackle a leaky toilet, hiring a plumber can save you a ton of hassle and frustration. Sometimes, it’s just more convenient to let the professionals handle the dirty work.
Remember, ignoring persistent or complex leaks can spell disaster for your wallet and your toilet. So, don’t hesitate to reach out to a professional when needed. Your throne and your bank account will thank you.
If you’re dealing with a toilet flange that is not properly aligned with the wall, check out our article on how to fix a toilet flange that is too far from the wall for step-by-step instructions on how to resolve this issue.
CONCLUSION
In conclusion, understanding the common causes and signs of a leak between the toilet tank and bowl is crucial for any homeowner. By following the steps outlined in this article, such as identifying the source of the leak, shutting off the water supply, and replacing the tank-to-bowl gasket, individuals can effectively fix the issue and prevent further damage. Additionally, troubleshooting other possible issues like a damaged flapper or faulty fill valve can help address any additional leaks.
Implementing preventive measures, such as regular toilet maintenance, can also help avoid future leaks. If the problem persists or if individuals are unsure about their abilities, it is recommended to seek professional help. This article provides valuable information and guidance to address toilet leaks, ensuring a more efficient and problem-free plumbing system.
For more helpful articles on plumbing maintenance and repairs, continue exploring our website for a wide range of informative resources.
FAQ
Why is my toilet leaking around the tank?
To fix a toilet gasket issue, start by removing the two bolts that connect the toilet tank to the toilet bowl. This can be done using a screwdriver and an adjustable wrench. These bolts are equipped with rubber gaskets or washers that prevent leaks. Replace these worn-out gaskets with new ones to ensure a proper seal and prevent any future leaks.
Should there be space between toilet tank and bowl?
To ensure a proper seal and prevent leaks, it is important to tighten the tank bolts of a toilet correctly. Most toilets have a small gap, typically ranging from a ¼ to a ½ inch, between the tank and the bowl. If the bolts are too loose, water can seep through the rubber washers and down the bolts, causing leaks. On the other hand, tightening the bolts too much can lead to the tank cracking. Finding the right balance in tightening the tank bolts is crucial for maintaining a leak-free and functional toilet.
Why is my toilet leaking at the bottom of the tank when I flush?
To prevent leaks from the base of your toilet when you flush, make sure to tighten the toilet tee bolts. These bolts secure the toilet to the floor and if they are not tightened properly, the wax ring underneath them may not create a water-tight seal. To fix this issue, begin by removing the caps using a putty knife or flathead screwdriver, and then tighten the bolts securely. By doing so, you can ensure that your toilet remains free from leaks and operates smoothly.