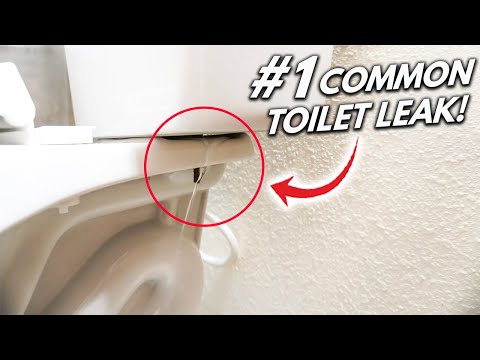
Are you dealing with a frustrating toilet leak between the tank and bowl ? Don’t worry, you’re not alone. Leaks in this area can be a common plumbing issue that many homeowners encounter.
In this article, we will explore the various causes of these toilet leaks between the tank and bowl and provide you with a step-by-step guide on how to fix them. Whether you’re a DIY enthusiast or simply looking to understand the problem better before calling a professional, this article has got you covered. So, let’s dive in and discover why toilet leaks between the tank and bowl occur and how you can address them effectively.
This article is important for anyone who is experiencing a toilet leak between the tank and bowl and wants to understand the underlying causes and potential solutions. By knowing the reasons behind these toilet leaks between the tank and bowl, readers will be equipped with the knowledge to diagnose and fix the issue themselves or communicate effectively with a plumber. Did you know that a leaking toilet can waste gallons of water every day?
Identifying and resolving the toilet leaks between the tank and bowl can not only save you money on your water bill but also contribute to water conservation efforts. So, let’s get started on resolving this common plumbing problem.
Briefly explained: what you need to know about the subject
- The main causes of toilet leaks between the tank and bowl are a cracked tank, problematic gaskets, and loose tank bolts.
- To identify a leak, you can perform a visual inspection or a water dye test.
- A step-by-step guide to fixing leaks includes diagnosing the problem, gathering necessary tools and materials, turning off the water supply, draining the tank, tightening the tank bolts, replacing the gasket, and testing the toilet.

Cracked Tank
Beware of the dreaded toilet leaks caused by a cracked tank! Keep an eye out for any signs of trouble, like visible cracks, water pooling around the base, or floor discoloration. Remember that age, wear and tear, as well as accidental damage, can all contribute to a cracked tank.
Stay vigilant by avoiding placing heavy objects on the tank, being cautious during cleaning, and scheduling regular maintenance and inspections. With a little proactive care, you can ensure a leak-free and well-maintained toilet.
Problematic Gaskets
In the realm of the porcelain throne, a delicate dance between the tank and bowl can sometimes be disrupted by troublesome gaskets. Behold the signs of their mischievous presence: water gathering around the toilet’s base, the floor adorned with discolored stains. These are the telltale marks of faulty gaskets, yearning to be replaced.
Wear and tear, the relentless assault of high water pressure, or even the malevolent touch of harsh cleaning chemicals can all conspire to weaken these vital seals. Swift action is essential to quell their treacherous endeavors, for leaks and water damage lurk in their wake. Fear not, for the remedy to this watery menace lies in the replacement of these faulty gaskets.
Choose wisely, dear reader, for the right gasket shall herald a realm free from leaks and the burden of costly repairs. Install it with care, following the sacred steps of proper installation, and revel in the tranquility of a leak-free sanctuary. Should your vigilant eye catch even the faintest whisper of problematic gaskets in your regal lavatory, delay not.
Cast them aside and embrace the blissful embrace of a bathroom experience devoid of leaks .
If you’re dealing with a toilet that’s leaking between the tank and bowl, check out our article “Toilet Leaking Between Tank and Bowl” for helpful tips on how to fix this common issue.

Loose Tank Bolts
Neglecting the loose tank bolts in your toilet can have dire consequences, including pesky leaks and water damage. These bolts play a crucial role in maintaining a tight connection between the tank and bowl. When they become loose, water finds its way through the gap, resulting in incessant dripping or a slow leak that wastes precious water.
Furthermore, this can pave the way for the growth of mold and mildew, posing a threat to your well-being. To rectify this predicament, commence by turning off the water supply to your toilet to preempt any potential leaks . Next, employ a wrench to securely fasten the bolts.
However, exercise caution and avoid overtightening, as this could inflict damage upon the toilet. Make it a habit to periodically inspect and tighten the tank bolts, ensuring a leak-free toilet and optimal functionality. Devoting a few moments to this simple task can spare you from costly water damage and extend the lifespan of your toilet.
Fixing a Toilet Leak between the Tank and Bowl: Step-by-Step Guide
- Diagnose the problem by inspecting the toilet for any cracks, damaged gaskets, or loose tank bolts.
- Gather the necessary tools and materials such as a wrench, replacement gasket, and water dye (for testing).
- Turn off the water supply to the toilet using the shut-off valve located behind or near the toilet.
- Drain the tank by flushing the toilet and holding down the handle until the water stops flowing.
- Tighten the tank bolts using a wrench to ensure a secure connection between the tank and bowl.
Visual Inspection
In your quest to uncover a sneaky leak between your toilet tank and bowl, be on the lookout for telltale signs such as water pooling around the toilet’s base, cracks or chips in the tank or bowl, as well as any discoloration or water stains on the floor. These subtle indicators serve as red flags, hinting at an underlying issue. By keenly observing these visual cues and maintaining vigilance, you can swiftly detect a leak in its infancy and prevent further havoc from wreaking havoc upon your humble abode.
Water Dye Test
Detecting leaks between the toilet tank and bowl is a breeze with a water dye test. Just add a few drops of food coloring or a dye tablet to the tank water, then flush the toilet. If the water in the bowl turns colored, voila!
You’ve got yourself a leak. This simple and affordable test can be done by anyone, without the need for a professional. Interpreting the results is a piece of cake.
If you spot colored water in the bowl, it means there’s a leak, which could be caused by a faulty gasket or loose tank bolts. On the other hand, if the water remains clear, congratulations! Your toilet is leak-free.
By performing this test and understanding its outcome, you’ll be able to fix any leaks and prevent further damage. Remember, early leak detection saves you from costly repairs and unnecessary water wastage.

Are you dealing with a hidden toilet leak between the tank and bowl? Learn how to fix this common issue with a DIY tutorial in our featured video.
Step 1: Diagnose the Problem
In order to rectify a toilet leak, it is essential to first determine the root of the issue. This can be attributed to various factors such as cracked tanks, faulty gaskets, or loose tank bolts. To accurately identify the source, a visual inspection and water dye test are imperative.
During the visual inspection, carefully examine the base of the toilet for any signs of water accumulation, as well as cracks or chips in the tank or bowl. Discoloration or water stains on the floor may also indicate a leak between the tank and bowl. To further pinpoint the exact location of the leak, conduct a water dye test.
Simply add a few drops of food coloring or a water dye tablet to the tank. If the water in the bowl changes color without flushing, this confirms the presence of a leak between the tank and bowl. Once you have successfully identified the cause, you can proceed with the necessary repairs.
Whether it involves a cracked tank, faulty gaskets, or loose tank bolts, having a comprehensive understanding of the problem will guide your actions and prevent any further damage.
Step 2: Gather Necessary Tools and Materials
To effectively fix toilet leaks, it is crucial to have the right tools at hand. An adjustable wrench, pliers, a screwdriver, and a putty knife are essential for the task. With these tools, you can effortlessly loosen bolts, remove gaskets, and scrape off old sealant.
In the case of a cracked tank, a tank repair kit with epoxy resin and a fiberglass patch is necessary. This powerful combination seals and strengthens the crack, ensuring that no more leaks occur. If the issue lies with faulty gaskets, specialized tools such as a gasket removal tool and installation tool may be required.
These tools provide the precision needed to safely remove and replace the gasket. By gathering these tools and materials, you can confidently tackle any toilet leak. However, always prioritize your safety and seek professional assistance if you are uncertain about any step.
Did you know that a leaking toilet can waste up to 200 gallons of water per day? That’s equivalent to flushing your toilet over 10 times an hour!

Step 3: Turn Off the Water Supply
Ensuring safety and preventing further damage are paramount when embarking on any repairs for a toilet leak between the tank and bowl. The first step is to turn off the water supply, reducing the risk of flooding and creating a secure workspace. Locate the shut-off valve near the base of the toilet and turn it clockwise until fully closed.
To verify that the water flow has ceased, flush the toilet and check for any remaining water. Remember, taking a moment to halt the water supply is a straightforward but essential measure in safeguarding against additional harm and guaranteeing a successful repair process. Always prioritize safety when tackling plumbing repairs.
If you want to know how to turn off the toilet water and prevent any potential leaks or emergencies, check out our article “Turn Off Toilet Water” .

Step 4: Drain the Tank
Before beginning any repairs, it is essential to empty the tank completely. To ensure a safe and efficient drainage process when dealing with a leak between the tank and bowl, here are the steps to follow:
1. Shut off the water supply: To prevent any water flow during the draining process, turn the valve behind the toilet clockwise until it is fully closed.
2. Flush the toilet: After shutting off the water supply, flush the toilet to remove as much water as possible from the tank.
3. Remove any remaining water : Starting from the bottom and working your way up, use a sponge or towel to soak up any remaining water. Squeeze the water into a bucket. By draining the tank before starting your repairs , you not only prevent any potential water damage but also create a dry and suitable working area.
Follow these steps diligently to empty the tank safely and proceed with your repairs confidently.
Common Causes and How to Identify Leaks Between the Toilet Tank and Bowl
- A cracked tank can be a common cause of leaks between the toilet tank and bowl. The crack may be visible or hidden, but it can lead to water seeping out and causing a leak.
- Problematic gaskets, such as the tank-to-bowl gasket or the spud washer, can also cause leaks. These gaskets may become brittle or worn over time, allowing water to escape.
- Loose tank bolts can contribute to leaks between the tank and bowl. If the bolts that secure the tank to the bowl are not properly tightened, water can seep out and cause a leak.
- Identifying a leak between the toilet tank and bowl can be done through visual inspection. Look for signs of water pooling or staining around the base of the toilet.
- A water dye test can help confirm if there is a leak. Add a few drops of food coloring to the tank water and wait a few minutes. If the colored water appears in the bowl without flushing, there is likely a leak.
Step 5: Tighten the Tank Bolts
Properly securing tank bolts is essential when repairing toilet leaks . Avoid excessive tightening to prevent damage and use the appropriate tools for the job. Ensuring an even and balanced connection is key.
Regular maintenance and tightening of bolts will prevent future leaks and potential water damage.
If you’re dealing with a toilet leaking from the tank bolts, check out our article “Toilet Leaking from Tank Bolts” to learn how to fix the issue and prevent future leaks.
Step 6: Replace the Gasket
The pivotal sixth step in repairing toilet leaks involves the crucial task of replacing the gasket. This small but mighty component serves as a barrier between the tank and bowl, preventing any unwanted water from escaping its confines. Firstly, to remove the old gasket, it is imperative to shut off the water supply, drain the tank, and delicately remove the bolts that anchor the tank in place.
With great care, lift the tank away from the bowl and gently pry off the old gasket, ensuring not to inflict any damage upon the surfaces. Next, to install the new gasket, diligently cleanse the surfaces of both the bowl and tank, eliminating any debris that may impede a proper seal. Once pristine, securely position the new gasket in its designated spot.
To guarantee a flawless seal, it is of utmost importance to evenly tighten the bolts without applying excessive force, as this may cause harm. Once the bolts are secure, switch the water supply back on and meticulously check for any lingering leaks. By diligently adhering to these steps and enlisting the assistance of a professional plumber if necessary, one can effectively rectify leaks between the toilet tank and bowl, restoring harmony to this essential fixture of daily life.

Common Causes of Toilet Leaks – Tabelle
| Cause | Description |
|---|---|
| Cracked Tank | When the toilet tank has a crack, it can lead to leaks between the tank and bowl. The crack allows water to escape and cause leakage. Cracks can occur due to age, impact, or manufacturing defects. It is important to inspect the tank regularly for cracks and replace it if necessary. |
| Problematic Gaskets | Faulty gaskets, such as worn-out or improperly installed ones, can result in leaks between the tank and bowl. Gaskets provide a seal between the two components, and when they fail, water can seep through. Regular maintenance should include checking and replacing gaskets as needed to prevent leaks. |
| Loose Tank Bolts | If the tank bolts holding the tank to the bowl are loose, it can create gaps that enable water to leak. The bolts should be securely tightened using the appropriate tools to prevent any leakage. Regularly inspecting and tightening the tank bolts can help maintain a watertight connection between the tank and bowl. |
| Worn-out Flush Valve | The flush valve, which controls the release of water from the tank into the bowl during flushing, can wear out over time. A worn-out flush valve can cause continuous or intermittent leakage. Regularly inspecting and replacing the flush valve can help prevent water wastage and maintain proper flushing functionality. |
| Failed Wax Ring | The wax ring is a seal located between the toilet bowl and the floor drain. If the wax ring fails or becomes damaged, it can result in leaks around the base of the toilet. This can be caused by improper installation, age, or shifting of the toilet. Replacing the wax ring when necessary and ensuring proper installation can prevent leaks in this area. |
| Malfunctioning Fill Valve | The fill valve, also known as the ballcock, regulates the water level in the toilet tank after flushing. A malfunctioning fill valve can cause water to continuously run into the overflow tube, leading to wastage and potential leaks. Regularly checking and replacing the fill valve can help maintain proper water levels and prevent leaks. |
| Corroded Flush Handle | A corroded or faulty flush handle can result in a toilet that does not properly flush or stops flushing altogether. This can lead to repeated flushing attempts, wasting water and potentially causing leaks. Inspecting and replacing the flush handle when necessary can ensure proper flushing functionality and prevent water wastage. |
| Improperly Adjusted Float Assembly | The float assembly, which controls the filling of the toilet tank with water, can cause leaks if it is improperly adjusted. If the float is set too high, the water level will rise above the overflow tube, causing continuous leakage. Regularly checking and adjusting the float assembly can prevent water wastage and maintain optimal water levels. |
Step 7: Test the Toilet
The Toilet’s Test Once the toilet tank and bowl have been repaired, it is essential to conduct a thorough test to ensure there are no lingering leaks. This step is crucial in confirming the efficacy of the repairs and preventing future complications . Begin by flushing the toilet and observing the flushing mechanism closely.
Keep an eye out for any signs of water leakage around the tank or bowl, such as water pooling at the base or water stains on the floor. These indications may suggest that the repairs were not successful and further action is required. Take note of the water flow during flushing.
It should be smooth and consistent, devoid of any spluttering or irregularities. If there are any disruptions, such as a clogged pipe or problems with the flushing mechanism, it is advisable to seek professional assistance to diagnose and rectify the issue. Additionally, listen attentively for any unusual sounds, such as gurgling or hissing.
These noises could signify plumbing problems with the water supply or drainage system. By meticulously testing the toilet after repairs, you can be confident that all leaks have been resolved and identify any potential issues that may necessitate further attention. Remember, it is always preferable to promptly address problems to prevent further damage and costly repairs in the future.
If you’re wondering how to adjust the water level in your toilet tank, check out our article on “Adjusting Water Level in Toilet Tank” for step-by-step instructions and tips on resolving any issues with your toilet’s water level.

1/2 Professional Help: When to Call a Plumber
When it comes to toilet leaks, sometimes it’s best to leave it to the professionals. While minor leaks can be fixed on your own, there are signs that indicate the need for expert assistance. A persistent and recurring leak that just won’t go away is a red flag for a more serious underlying issue.
Water pooling around the base of the toilet or a sudden increase in your water bill are also clear indications that it’s time to call in the pros. Cracked tanks, faulty gaskets, and loose tank bolts are common plumbing problems that require the skills of a trained plumber. These issues can be tricky to tackle on your own and may require specialized tools.
By hiring a professional, you can be confident that the problem will be correctly diagnosed and repaired, saving you time, money, and a whole lot of frustration. Hiring a plumber for toilet leak repairs comes with several benefits. They have the experience and know-how to quickly identify the cause of the leak and provide a lasting solution.
Plumbers also have access to high-quality replacement parts, ensuring that the repair is done properly. When you hire a professional plumber, you can rest easy knowing that your toilet is in capable hands. So, if you find yourself dealing with a pesky toilet leak between the tank and bowl and don’t know where to start, it’s best to call in the experts.
A plumber can provide the professional help you need to get your toilet back up and running in no time.
2/2 CONCLUSION
In conclusion, understanding the causes, identification, and step-by-step guide to fixing toilet leaks between the tank and bowl is crucial for homeowners. By addressing common issues such as cracked tanks, problematic gaskets, and loose tank bolts, individuals can effectively resolve these leaks and prevent further damage. This article provides valuable information and practical steps that empower readers to tackle this issue on their own.
However, if the problem persists or seems too complex, it is recommended to seek professional help from a plumber. We hope this article has been helpful, and we encourage readers to explore our other articles for more informative content on plumbing and home maintenance.
FAQ
How do you fix a leaky toilet between tank and bowl?
To access the toilet gasket, start by removing the two bolts that connect the toilet tank to the toilet bowl. This can be done using a screwdriver and an adjustable wrench. Each bolt will have a rubber gasket or washer, which is important for preventing leaks. It is recommended to replace these gaskets with new ones to ensure a proper seal.
Why is my toilet leaking from the pipe in the tank?
Here are a couple of reasons why your toilet supply line may be leaking: 1. Loose fittings: If the fittings connecting the supply line to the toilet tank or shut-off valve are not properly tightened, water can seep through the gaps, resulting in a leak. Make sure to check and tighten these fittings regularly to prevent leaks. 2. High water pressure: Excessively high water pressure can put strain on the supply line, leading to it bursting or developing leaks over time. Consider installing a pressure regulator to regulate the water pressure and protect your supply line from damage. Remember, addressing these issues promptly can help prevent water damage and ensure your toilet operates efficiently.
What is the part between the toilet tank and bowl?
The tank O-ring seal is a rubber gasket placed between the toilet tank and bowl. Its primary purpose is to create a tight seal, effectively preventing any leaks from occurring. This essential component ensures that water remains contained within the toilet tank, preventing any potential water damage or wastage. Without the O-ring seal, water could seep out and cause problems such as puddles on the floor or continuous water flow, leading to increased water consumption and higher utility bills. By securely sealing the connection between the tank and bowl, the O-ring seal plays a crucial role in maintaining the proper functioning of the toilet system.
Why is my toilet leaking from the tank only when flushed?
If your toilet is leaking at the base whenever you flush, there could be a few reasons behind it. One possibility is that your fill or supply valves may be loose. Another reason could be a cracked toilet tank. Additionally, the flapper may not be properly shutting over the valve seat, which can result in a leak from the flush valve. These are common issues that can cause toilet leaks at the base.