Are you experiencing a frustrating leak in your Delta shower head? Don’t worry, you’re not alone. Leaking shower heads can be a common issue that many homeowners face.
In this article, we will explore the components of a Delta shower head, how it works, and the common reasons why it may be leaking. Understanding the cause of the delta shower head leaking is crucial in order to effectively fix the problem and prevent future leaks. So, if you’re tired of dealing with a leaky shower head, keep reading to discover the solutions and prevention methods that will help you regain a fully functional and leak-free shower experience.
The most important facts in a nutshell
- Understanding the components and workings of a Delta Shower Head
- Common causes of a leaking Delta Shower Head including problems with the shower valve, worn out cartridge, and issues with the diverter valve
- Steps to determine the cause of the leak, fix a leaking Delta Shower Head, and prevent future leaks through regular maintenance and early problem identification

Components of a Delta Shower Head
Embarking on the quest for the perfect shower head is like a journey into a world of endless possibilities. Each option holds the potential to transform your daily shower into a symphony of water and relaxation. From gentle rain showers to invigorating massages, there’s a shower head out there that’s just right for you.
But the quest doesn’t end with choosing the perfect shower head. To truly unlock its magic, proper maintenance is essential. Like any precious gem, your shower head requires care and attention.
Regular cleaning to remove mineral buildup, checking for leaks and loose connections, and promptly replacing worn-out parts are all vital to ensuring its longevity . So take the plunge into the world of shower heads, explore the options, and find the one that speaks to your soul. With the right choice and a little TLC, your daily shower will become a moment of bliss and rejuvenation, a sanctuary where you can wash away the worries of the day and emerge refreshed and renewed.
How Does a Delta Shower Head Work?
A Delta shower head is not your ordinary bathroom fixture. It’s a meticulously crafted device that guarantees a shower experience like no other. But have you ever wondered about its inner workings?
The water flow mechanism in a Delta shower head is ingeniously designed to deliver a consistent and invigorating stream of water. It all begins with the water supply, which flows through pipes and into the shower head. As the water enters, it passes through carefully engineered components that control and enhance the water pressure.
One remarkable feature of a Delta shower head is its pressure balancing system. This system ensures that the water pressure remains stable, even when there are fluctuations in the water supply. So you can enjoy a shower without any sudden changes in temperature or water pressure, providing ultimate comfort.
Furthermore, Delta shower heads offer a variety of spray settings, allowing you to personalize your shower experience. Whether you desire a gentle rainfall or a vigorous massage, these spray settings cater to your unique preferences. They provide a multitude of benefits, from soothing tired muscles to awakening your senses.
By understanding how your Delta shower head operates, you can elevate your shower experience to new heights. So the next time you step into your bathroom, take a moment to appreciate the engineering marvel that awaits you – your Delta shower head.
If you’re dealing with a delta shower leaking, check out our article “Delta Shower Leaking” for tips and solutions on how to fix the issue and prevent future leaks.

Problem with the Shower Valve
Leaky Delta shower heads can be a real headache for homeowners. Not only do they waste water and potentially damage your bathroom, but they can also be incredibly frustrating. Thankfully, there are some simple solutions.
If the problem lies with a faulty seal, start by turning off the water supply. Then, remove the shower handle and replace the seal. This should fix the issue and stop any leaks.
Sometimes, the culprit behind a leaky shower head is excessive water pressure or a buildup of corrosion or minerals . In these cases, installing a pressure regulator can help regulate the water flow and prevent any strain on the shower valve. If corrosion or mineral buildup is affecting the valve’s performance, you may need to clean or replace it.
Regular maintenance and cleaning are key to preventing any buildup and ensuring that your Delta shower head functions properly. By addressing these common issues, you can put an end to leaks and enjoy optimal performance from your shower head.
Did you know that Delta shower heads are designed to save water without sacrificing performance? They use technology that increases the velocity of the water, so you get a powerful shower while still conserving water.

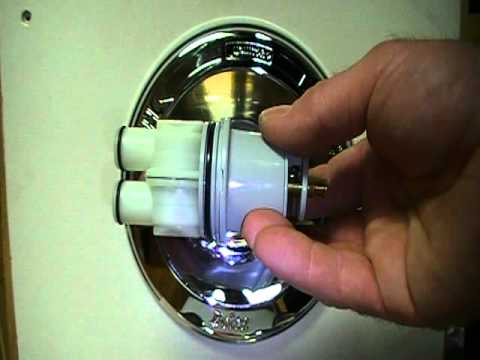
Worn Out Cartridge
Have you ever experienced the frustration of a malfunctioning Delta shower head? If so, the culprit could be a worn-out cartridge. Look out for signs such as decreased water flow , inconsistent temperature, or pesky leaks around the shower head.
Should any of these issues arise, it’s high time to bid farewell to the old cartridge and welcome a new one. Thankfully, the process of replacing the cartridge is a breeze. Begin by shutting off the water supply to your shower, then detach the shower head and locate the cartridge nestled within the shower valve.
With caution, swap out the tired cartridge for a fresh one, making sure to adhere to the manufacturer’s instructions. To ward off future leaks and maintain optimal performance, it is crucial to regularly inspect and care for the cartridge. Every six months, take a moment to check for signs of wear or damage, and clear away any mineral buildup or debris that may hamper its efficiency.
Embracing these simple steps will ensure that your Delta shower head remains in impeccable condition, guaranteeing a revitalizing shower each and every time.
Issues with the Diverter Valve
Leaking can be a common issue with the diverter valve in your Delta shower head. Over time, the rubber seals inside the valve may deteriorate, causing leaks. Improper installation can also lead to this problem.
Additionally, mineral buildup from hard water can affect the valve’s functionality. Regular cleaning and maintenance can help prevent these issues. If you do notice any leaks or problems, it’s crucial to address them promptly to avoid further damage and expensive repairs.
By being aware of these common issues and taking the necessary steps to fix them, you can ensure a leak-free and fully functional Delta shower head.
If you’re dealing with a leaking Moen shower head, check out our article “Moen Shower Head Leaking” for tips on how to fix it and prevent future leaks.

If you’re dealing with a leaky Delta shower head, don’t worry! In this video, you’ll learn how to repair a single lever shower faucet and set the temperature. Get ready to fix that annoying leak and enjoy a hassle-free shower experience. Let’s dive right in!
Checking for Visible Damage
In the pursuit of unraveling the enigma of a leaking Delta shower head, one must embark upon a meticulous investigation. Behold, the first step in this odyssey is to cast your gaze upon the shower head itself, searching for any telltale signs of visible damage. Seek out the sly water stains or the treacherous discoloration, for they may hold the key to this aquatic conundrum.
But lo and behold, do not stop there, for the body of the shower head must also be scrutinized for any cracks or breaks that could betray a leak. And let us not forget the sacred connection between the shower head and the shower arm, for a loose or damaged union could unleash a deluge of water upon unsuspecting souls. By delving deep into these visible manifestations of disrepair, one can unearth the very essence of the leak and embark upon the noble quest to rectify it.
And remember, my dear reader, a vigilant eye and a steadfast commitment to the maintenance of your Delta shower head shall safeguard its longevity and ward off any future leaks that may dare to assail it.
Identifying Leaks in the Shower Valve
Keep an eye out for these telltale signs to identify leaks in your shower valve: water seepage near the handle, the subtle hiss or drip of water escaping the valve, and the presence of dampness or mold around the valve. These red flags are clear indicators of a leak. Not only do leaks result in water wastage, but they also pose a threat to your bathroom’s integrity.
It is crucial to promptly address and resolve any leaks. In cases of intricate or severe leaks, it is advisable to seek professional assistance. By regularly inspecting for leaks and taking immediate action, you can ensure the optimal functioning of your shower head system.
Inspecting the Cartridge for Wear and Tear
Ensuring Your Delta Shower Head’s Peak Performance In order to maintain the peak performance of your Delta shower head, it is essential to regularly check for cartridge wear and tear . Over time, the cartridge can deteriorate, resulting in leaks and reduced water flow. However, how can you determine if your cartridge needs replacement?
One obvious indication of a worn-out cartridge is a noticeable decrease in water pressure. If you are experiencing a weak stream of water, it is time to inspect the cartridge. Additionally, any leaks around the shower head or handle may suggest that the cartridge requires attention.
The process of replacing a worn-out cartridge in a Delta shower head is simple. Begin by turning off the water supply to the shower. Next, remove the shower head and handle to gain access to the cartridge.
Carefully examine the cartridge for any signs of damage or deterioration. If it is worn out or damaged, replace it with a new one. Regularly inspecting and maintaining the cartridge is crucial for preventing future leaks and ensuring the long lifespan of your Delta shower head.
By taking a proactive approach and addressing any wear and tear early on, you can avoid costly repairs and enjoy a consistent and powerful shower experience. Always remember, the cartridge is the heart of your Delta shower head. By giving it the attention it deserves, you can ensure years of smooth and satisfying showers.
If you’re dealing with a leaking Delta shower faucet, check out our article “Delta Shower Faucet Leaking” for tips on how to fix the issue and prevent future leaks.

Possible heading: Troubleshooting Guide for Shower Issues (Tabelle)
| Issue | Possible Cause | Solution |
|---|---|---|
| Dripping from shower head | Problem with the shower valve | Replace or repair the shower valve |
| Worn out cartridge | Replace the cartridge | |
| Issues with the diverter valve | Fix or replace the diverter valve | |
| Water leaking from handle | Loose or damaged handle assembly | Tighten or replace the handle assembly |
| Worn out O-rings or washers | Replace the O-rings or washers | |
| Water leaking at the base | Loose connection between shower head and arm | Tighten the connection or use Teflon tape |
| Damaged rubber gasket or sealing ring | Replace the gasket or sealing ring | |
| Uneven water flow | Mineral deposits or clogs in the shower head | Clean or descale the shower head |
| Low water pressure in the plumbing system | Check and address any issues with water pressure | |
| Incorrect installation or shower head type | Reinstall correctly or choose appropriate type | |
| Leaking during diverter use | Faulty diverter valve | Replace the diverter valve |
| Loose or damaged diverter handle | Tighten or replace the diverter handle | |
| Low water pressure | Partially closed water supply valve | Open the water supply valve fully |
| Clogged water supply pipes | Clean or replace the clogged pipes | |
| Water pressure regulator set too low | Adjust the water pressure regulator | |
| Leaking or damaged water supply pipes | Repair or replace the leaking pipes | |
| Hot water not working | Malfunctioning water heater | Check the water heater and repair or replace if necessary |
| Tripped circuit breaker or blown fuse | Reset the breaker or replace the fuse | |
| Malfunctioning thermostat | Repair or replace the thermostat | |
| Gas supply issue (for gas water heaters) | Check the gas supply and address any issues | |
| Water temperature fluctuations | Malfunctioning shower mixer valve | Repair or replace the shower mixer valve |
| Issues with the hot and cold water supply | Check and balance the hot and cold water supply | |
| Strange noises from the shower | Water hammer caused by sudden valve closure | Install water hammer arrestors |
| Loose or damaged pipes | Tighten or replace the pipes | |
| Mineral deposits in the pipes | Flush or descale the pipes |
Replacing a Damaged Shower Valve
A damaged shower valve can wreak havoc in your bathroom, causing leaks and reducing water flow from your Delta shower head. Keep an eye out for telltale signs like water stains, discoloration, or the sound of hissing or dripping. To fix this issue, you’ll need a few tools: an adjustable wrench, a screwdriver, and plumber’s tape.
Now, let’s dive into how to replace a damaged shower valve:
1. First things first, turn off the water supply to your shower. Locate the main water valve for your home and shut it off.
2. Find the set screw underneath or on the side of the shower handle and unscrew it to remove the handle.
3. Grab your trusty screwdriver and use it to remove the trim plate that covers the valve.
4. Loosen and remove the valve cartridge with an adjustable wrench. This is the culprit behind your shower troubles.
5. Now, it’s time to bring in the new hero . Insert the new shower valve cartridge into the valve body, making sure it’s aligned and securely in place.
6. Reattach the trim plate and screw it back into place, ensuring a snug fit.
7. Finally, tighten the set screw to reinstall the shower handle, giving it a firm and steady grip. By following these steps, you’ll bid farewell to those pesky leaks and welcome back a fully functional shower. Get ready to enjoy the bliss of a refreshing shower once again.
Changing a Worn-Out Cartridge
Experience the invigorating power of your Delta shower head with a simple fix. If you’re noticing a decrease in water pressure, irregular flow, or leaks around the head or handle, it might be time to replace the worn-out cartridge. To start, turn off the water supply and prepare for a quick fix.
Remove the handle and trim to access the cartridge. With ease, take out the old cartridge and replace it with a new one, ensuring proper alignment and security. Finally, reassemble everything and turn the water supply back on.
Remember, regular inspection and maintenance of the cartridge will help prevent future issues. Don’t underestimate the impact of this small component – it’s the key to an optimal shower experience.

How to Fix a Leaking Delta Shower Head: Step-by-Step Guide
- Inspect the shower head for visible damage or loose connections.
- Check the shower valve for leaks by turning on the water and observing any water dripping from the valve.
- Examine the cartridge for wear and tear by removing it from the shower head and inspecting it for cracks or damage.
- Replace a damaged shower valve by turning off the water supply, removing the old valve, and installing a new one according to the manufacturer’s instructions.
- Change a worn-out cartridge by removing the old one and replacing it with a new cartridge that matches the model of your Delta shower head.
- Fix the diverter valve by removing it from the shower head and replacing it with a new one if necessary.
- Prevent future leaks by regularly maintaining your Delta shower head, such as cleaning it and checking for any signs of damage or leaks.
Fixing the Diverter Valve
Resolving a Leaky Delta Shower Head Experience a leaky Delta shower head? No worries, we’ve got the perfect solution for you! Let’s address the issue by tackling the diverter valve.
Over time, mineral buildup can lead to leaks. Don’t fret, simply turn off the water supply and unscrew the diverter valve. Soak it in a mixture of vinegar and water for 30 minutes, then gently scrub away any remaining buildup.
Rinse thoroughly and reinstall the valve securely. The key lies in proper reinstallation. Ensure the valve is tightly secured and aligned accurately.
Take a moment to inspect all connections for any debris or mineral buildup. Avoid common mistakes when fixing the diverter valve. Remember, over-tightening can cause damage or leaks, so aim for a snug seal.
Additionally, steer clear from using harsh chemicals or abrasive materials during the cleaning process. By carefully following these steps, you can effectively fix your leaking Delta shower head. Don’t forget to regularly maintain and inspect it to prevent future leaks and extend its lifespan.
Say goodbye to leaks and enjoy your refreshing showers!
Regular Maintenance of Your Delta Shower Head
In order to maintain the pristine condition of your Delta shower head and avoid any complications, it is imperative to engage in regular maintenance. An essential step in this process involves cleaning the shower head to eliminate the accumulation of minerals that can impede water flow and disrupt the delightful spray patterns. To do this, simply unscrew the shower head and immerse it in a solution of vinegar and water for a mere 15 minutes.
Subsequently, utilize a gentle brush to eliminate any residue before rinsing it thoroughly. Furthermore, it is crucial to inspect the shower head for any loose connections or leaks. Ensure that the shower head is securely fastened to the shower arm.
If you happen to detect any leaks, it would be wise to consider replacing worn-out gaskets or seals. These seemingly minute components play a pivotal role in preventing water from seeping out and resulting in undesirable leaks. You can easily procure replacements at your local hardware store or reach out to Delta for their expert assistance.
By diligently maintaining your Delta shower head on a regular basis, you will guarantee optimal performance and avert the possibility of leaks. Engaging in cleaning, inspecting connections, and replacing worn-out gaskets or seals will prolong its lifespan and enable it to function at its utmost potential. Therefore, it is advisable to make it a habit to provide your Delta shower head with some tender loving care, so that you may revel in a refreshing and leak-free shower experience each and every time.

How to Fix a Leaking Delta Shower Head: A Step-by-Step Guide
- Delta shower heads are known for their high-quality components and innovative designs.
- The main components of a Delta shower head include the shower valve, cartridge, and diverter valve.
- A Delta shower head works by controlling the flow and temperature of water through the shower valve.
- One common reason for a leaking Delta shower head is a problem with the shower valve, which may need to be replaced.
- Another possible cause of a leak is a worn-out cartridge, which can be easily replaced to fix the issue.
- The diverter valve, responsible for directing water to the shower head or tub spout, can also be a source of leaks.
- To determine the cause of the leak, you can check for visible damage, inspect the shower valve, and examine the cartridge for wear and tear.
- If the shower valve is damaged, it will need to be replaced to fix the leak.
- Changing a worn-out cartridge is a simple and effective way to stop the shower head from leaking.
- If the diverter valve is causing the leak, it can be fixed by replacing or repairing the valve.
- To prevent future leaks, regular maintenance of your Delta shower head is recommended, such as cleaning the shower head and checking for any signs of damage.
- Identifying potential problems early on is crucial in preventing leaks and ensuring the longevity of your Delta shower head.
- If you are unsure about how to fix a leaking Delta shower head, it is best to seek professional help to avoid causing further damage.
Identifying Potential Problems Early
Ensuring the longevity of your shower head requires regular inspection. Keep an eye out for water stains, discoloration, cracks, or breaks in the body. Monitoring water pressure is crucial to prevent leaks.
Watch for sudden changes in flow or spray patterns. Promptly address any issues to avoid costly repairs and maintain optimal functionality. By taking proactive measures, you can extend the lifespan of your shower head.
1/2 When to Seek Professional Help
If your Delta shower head is leaking and your attempts at DIY repairs have been unsuccessful, it’s crucial to bring in an expert plumber. There are specific signs that indicate a serious leak that necessitates professional assistance. One of the key indicators is a persistent leak that persists despite your efforts to fix it.
If you’ve attempted various repair methods and the leak persists, it’s best to enlist the help of a professional plumber who can identify the root cause and provide a lasting solution. Another sign that you require professional assistance is if you’re encountering multiple leaks throughout your shower head system. This could indicate a more complex issue that necessitates the expertise of a trained professional to diagnose and address.
Lastly, if you’re facing uncommon or intricate problems with your shower head system, it’s advisable to seek professional help. These problems may involve intricate components or necessitate specialized knowledge for proper resolution. A professional plumber will possess the necessary experience and tools to effectively tackle such issues.
Remember, prioritizing safety and ensuring the problem is resolved correctly is paramount when it comes to your shower head. Seeking professional help can save you time, money, and prevent potential long-term damage.
2/2 CONCLUSION
In conclusion, understanding the components and functionality of your Delta shower head is crucial in addressing and fixing any leaks. By identifying common causes such as issues with the shower valve, worn-out cartridges, and problems with the diverter valve, you can determine the root cause of the leak. Through careful inspection and maintenance, you can fix the issue by replacing damaged components or cartridges.
Regular maintenance and early problem identification are key to preventing future leaks. However, if you are unsure or uncomfortable with fixing the issue yourself, it is recommended to seek professional help. This article provides a comprehensive guide to addressing and preventing leaking Delta shower heads, catering to the search intent of users looking for solutions to their shower head problems.
For more helpful articles on plumbing and home maintenance, we recommend exploring our other resources on related topics.
FAQ
Why is my Delta shower head dripping?
Your Delta shower head may leak due to various reasons. One common cause is worn or damaged O-rings. Over time, the O-rings that create a seal between the shower head and the pipe can deteriorate, leading to water leakage around the connection. It’s important to check the condition of the O-rings and replace them if necessary to prevent further leakage.
Why is my shower head leaking from the front?
A leaking shower head is typically caused by a damaged or worn water-rubbed washer or o-ring. This is a common issue that can be easily fixed by homeowners without any special skills required. Simply replacing the washer or o-ring should solve the problem. This is a quick and straightforward solution that can save you the hassle and expense of calling a professional plumber.