Are you experiencing a frustrating and persistent problem with your Delta shower faucet leaking? If so, you’re not alone. Many homeowners face this issue, and it can be both annoying and costly if left unresolved.
In this article, we will explore the signs that indicate your Delta shower faucet is leaking, the reasons behind the leaks, and most importantly, how to troubleshoot and fix the problem. Whether you’re a DIY enthusiast or simply want to understand the issue before calling a professional plumber, this article will provide you with the necessary knowledge and steps to address the leaking Delta shower faucet in your home. So, let’s dive in and discover the solutions to this common plumbing predicament.
If you’re having trouble with your Delta shower leaking, check out our article “Delta Shower Leaking” for some helpful tips on how to fix the issue and prevent future leaks.
The Facts at a Glance
- Understanding the problem of a leaking Delta shower faucet
- How to troubleshoot and fix a leaking Delta shower faucet
- When to call a professional plumber and preventing future leaks in your Delta shower faucet

Signs Your Delta Shower Faucet is Leaking
A leaking Delta shower faucet can be identified by several signs in your bathroom. Keep an eye out for water pooling near the faucet’s base, a clear indication of internal component leakage. Also, listen for dripping or trickling sounds emanating from the faucet, signaling a possible leak.
Moreover, if you notice reduced water pressure or uneven water flow from the shower head, it could be another telltale sign of faucet valve leakage. It’s crucial not to overlook these signs, as they can lead to water damage and increased water bills. Take immediate action to avoid further harm and unnecessary waste.
Why Does a Delta Shower Faucet Leak?
Dealing with a leaky Delta shower faucet can be incredibly frustrating. There are several common reasons why this issue may occur, and it’s important to understand them in order to find a solution. Firstly, the faucet’s internal components may wear down over time due to constant use, resulting in leaks.
This is particularly true for older faucets that have been in use for a long time. Secondly, loose or damaged seals and gaskets can also contribute to leaks. These components are responsible for creating a tight seal within the faucet, and if they are compromised, water can escape.
Lastly, corrosion or mineral buildup within the faucet’s valves can lead to leaks or decreased water pressure. Over time, minerals from the water can accumulate in the valves, impacting their functionality. Addressing these underlying causes is crucial when it comes to preventing or fixing a leaky Delta shower faucet.
Regular maintenance, such as cleaning the faucet and checking for any loose connections, can help prevent wear and tear. Additionally, using genuine Delta replacement parts and promptly addressing any leaks that do occur will ensure a long-lasting and leak-free shower experience.

How to Fix a Leaking Delta Shower Faucet: A Complete Guide
- Leaking Delta shower faucets can lead to wasted water and higher water bills.
- Common signs of a leaking Delta shower faucet include dripping water, water pooling on the shower floor, or a constant running water sound.
- A leaking Delta shower faucet can be caused by various issues, such as a worn-out cartridge, a loose connection, or a faulty rubber gasket.
- Troubleshooting a leaking Delta shower faucet involves identifying the type of faucet you have and locating the source of the leak.
- Some tools you may need to fix a leaking Delta shower faucet include an adjustable wrench, a screwdriver, and replacement parts like a new cartridge or rubber gasket.
- Fixing a leaking Delta shower faucet typically involves replacing the cartridge, which is responsible for controlling the flow of water.
- If you’re unsure about your plumbing skills or the complexity of the repair, it’s best to call a professional plumber to avoid further damage.
Identifying the Type of Your Delta Shower Faucet
In the vast realm of bathroom fittings, the Delta shower faucet reigns supreme, offering an array of options to suit every taste and preference. From the elegant single-handle to the classic double-handle, and the technologically advanced thermostatic valves, each type possesses its own unique traits and components. To embark on the journey of troubleshooting, one must first acquaint oneself with the specific type of faucet at hand.
Seek the guidance of markings or labels adorning the handles and controls, or turn to the boundless wisdom of online images and diagrams. Armed with this knowledge, one shall unlock the gates to a world of solutions for any quandaries that may arise.
Locating the Source of the Leak
Embarking on a quest to uncover the hidden secrets of your Delta shower faucet, one must navigate through a labyrinth of possibilities. In your pursuit, cast your gaze upon the very foundation of the faucet, where the pooling of water reveals the clandestine presence of a leak. But do not stop there, for the faucet itself may whisper its secrets through the language of dripping or reduced water pressure.
And let us not forget the shower head, its uneven water flow an enigmatic clue. With a discerning eye, survey the faucet and its surroundings, seeking out any cracks, loose connections, or damaged seals and gaskets that may betray the leak’s whereabouts. Illuminate the shadows with the aid of a trusty flashlight, uncovering concealed sources within the faucet’s valves.
Through this meticulous investigation, the precise location of the leak shall be revealed, unveiling the path towards repair. Waste no time, dear reader, for leaks must be swiftly attended to, lest they inflict further harm upon your faucet’s longevity. Arm yourself with tools, embark upon this noble pursuit, and bid farewell to that vexatious leak once and for all!
Did you know that a dripping faucet can waste up to 3,000 gallons of water per year? That’s enough water to fill an average-sized swimming pool!

1/2 Tools Needed to Fix a Leaking Delta Shower Faucet
Embarking on a mission to conquer a leaking Delta shower faucet demands the aid of a few trusty tools. Secure an adjustable wrench and a screwdriver, as they will prove invaluable in disassembling and reassembling the intricate components of the faucet. A trusty flashlight shall illuminate any hidden leaks lurking in the depths of hard-to-reach regions.
And do not overlook the importance of plumber’s tape , for it shall serve as the guardian of a tight seal when piecing everything back together. Armed with these tools, one shall be ready to confront the task at hand, emerging victorious and triumphant, free from the clutches of time-wasting frustration. So, let the journey commence and banish that persistent leak once and for all!

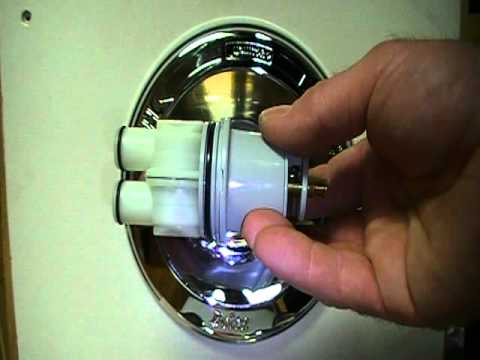
How to Replace a Delta Shower Faucet Cartridge
Repairing a leaking Delta shower faucet requires a few simple steps to replace the cartridge:
1. Begin by shutting off the main water valve in your home to stop the water supply to the shower faucet.
2. Remove the handle by unscrewing the set screw beneath it and gently pulling it off.
3. Use an adjustable wrench to loosen and remove the retaining nut that secures the cartridge in place.
4. Take out the old cartridge from the faucet body, paying attention to its orientation to ensure proper installation of the new one.
5. Clean the inside of the faucet body to remove any debris or buildup that could affect the performance of the new cartridge.
6. Insert the new cartridge, aligning it with the hot and cold water inlets, and firmly push it in until it is fully seated.
7. Reinstall the retaining nut securely, being careful not to overtighten it.
8. Slide the handle back onto the cartridge stem and tighten the set screw.
9. Turn on the water supply and carefully check for any leaks. If there are none and the water flows smoothly, congratulations! You have successfully replaced the Delta shower faucet cartridge.
Remember, taking the time to ensure a tight seal is crucial in preventing future leaks. Follow these steps diligently, and you will achieve a successful repair.
If you’re dealing with a leaking Delta shower faucet, don’t worry! In this video, you’ll learn how to repair it step by step. From fixing a single lever to adjusting the temperature, this tutorial has got you covered. Get ready to fix that annoying leak and enjoy a fully functional shower again.
Replacing the Spring and Rubber Gasket
When addressing a leaking Delta shower faucet, it is crucial to address the issue by replacing the spring and rubber gasket. These vital components play a significant role in preventing leaks and ensuring the proper functionality of the faucet. To begin the process, remove the old spring by either unscrewing the nut or employing the use of pliers.
Take a thorough look at the rubber gasket to assess any potential damage. If you notice any cracks or tears, it is imperative to replace it. To guarantee a secure and tight seal, it is advised to utilize plumber’s tape.
Wrap the tape around the faucet threads before proceeding with the reinstallation of the gasket. Lastly, insert the new spring and securely tighten the nut. It is crucial to ensure that everything is properly aligned and tightened to prevent any future leaks.
By diligently following these steps and regularly inspecting the gasket for signs of wear, you can effortlessly replace the spring and gasket in your Delta shower faucet, thereby transforming it into a leak-free fixture.
Complex Repairs
In the realm of intricate repairs for a Delta shower faucet plagued by leaks , it is wise to entrust the task to skilled professionals . These repairs demand specialized knowledge and tools, navigating a labyrinth of intricacies. Plumbers seasoned in their craft possess the expertise to swiftly pinpoint the leak’s origin and address it efficiently.
They may need to replace components or make minute adjustments to the faucet’s valves. Safeguarding the correct execution of the repair and the faucet’s smooth functioning hinges upon relying on their skillset. Embarking on such repairs solo could invite further damage and future repairs that are more burdensome to the pocket.
Thus, summoning the professionals spares time, money, and potential headaches.
If you’re tired of dealing with a constantly clogged toilet, check out our article “Why Does My Toilet Keep Clogging” to find out the common causes and effective solutions to this frustrating problem.

How to Fix a Leaking Delta Shower Faucet: A Step-by-Step Guide
- Identify the type of your Delta shower faucet.
- Locate the source of the leak.
- Gather the necessary tools for fixing the leak.
- Follow the step-by-step guide to fix the leaking Delta shower faucet.
Persistent Leaks
Unveiling the Mystery of Leaky Delta Shower Faucets Tackling a leaky Delta shower faucet can be quite a hassle. But what exactly is causing these stubborn leaks? Let’s delve into the depths and uncover the truth.
One of the primary culprits behind these leaks is the natural wear and tear of the faucet’s internal components. Regular usage and exposure to water gradually degrade them, resulting in those pesky leaks. Loose or damaged seals and gaskets can also take the blame.
If they’re not properly sealed , water can seep through, causing a persistent leak . Another common issue is the accumulation of corrosion or minerals in the faucet’s valves. This occurs when hard water, containing high mineral levels like calcium and magnesium, is present.
Over time, these minerals can build up and cause the valves to malfunction, leading to leaks. Taking swift action to address persistent leaks is crucial to prevent further damage. Ignoring them can result in water damage, mold growth, and even structural issues.
That’s why it’s essential to seek the expertise of a professional plumber who can accurately diagnose the problem and provide the necessary repairs or replacements. Don’t let those persistent leaks shatter your showering bliss. Act now and enlist the help of a professional plumber to restore your Delta shower faucet to its optimal condition.
Remember, a little proactive maintenance can go a long way in preventing future leaks and ensuring a serene, leak-free shower oasis.
Regular Maintenance
Maintaining your Delta shower faucet is crucial for its longevity and leak prevention. Follow these simple steps: Start by regularly cleaning the faucet to prevent mineral deposits and debris buildup. Use a gentle cleaner or vinegar solution and a soft cloth to remove any residue.
Next, check for loose connections that can cause leaks and low water pressure. Inspect the faucet and tighten any loose parts with an adjustable wrench. Lastly, lubricate the moving parts of the faucet to prevent leaks and difficulty in turning the handles.
Apply a small amount of plumber’s grease or silicone lubricant to the handles and spout for smooth operation. By incorporating these maintenance tasks into your routine, you’ll ensure a long-lasting Delta shower faucet and a worry-free showering experience.

Table: Faucet Troubleshooting Guide
| Problem Description | Possible Causes | Troubleshooting Steps | Tools Needed | Difficulty Level | Results/Resolution | Additional Tips | References |
|---|---|---|---|---|---|---|---|
| Dripping faucet | Worn-out cartridge, loose connections, damaged rubber gasket | 1. Check for loose connections and tighten if necessary. 2. Inspect the cartridge for signs of wear and replace if needed. 3. Replace the damaged rubber gasket if found. |
Adjustable wrench, screwdriver, pliers | Easy | Tightening loose connections and replacing damaged parts should stop the dripping and resolve the issue. | Before starting any repair work, turn off the water supply to avoid any accidents. Apply a lubricant to threaded connections to ensure smooth operation. |
[Insert relevant references] |
| Water pooling around the handle | Loose connections, damaged O-ring, worn-out seals | 1. Check for any loose connections and tighten them if necessary. 2. Inspect and replace the O-ring if it is damaged or worn out. 3. Replace any worn-out seals that may be causing the water pooling. |
Adjustable wrench, screwdriver | Moderate | Tightening loose connections and replacing damaged parts should stop the water pooling and resolve the issue. | Before starting any repair work, turn off the water supply to avoid any accidents. Clean the area around the handle to ensure a proper seal when replacing parts. |
[Insert relevant references] |
Using Quality Replacement Parts
Investing in high-quality replacement parts is crucial when it comes to fixing a leaking Delta shower faucet. Genuine Delta parts not only fit perfectly but also ensure a seamless installation process, free from any leaks or malfunctions. Made from durable materials, these parts guarantee optimal functioning for years to come.
On the other hand, opting for low-quality parts can result in frequent leaks and malfunctions, leading to wasted water and higher utility bills. To ensure the utmost quality, it is advisable to purchase from authorized dealers or trusted online retailers. By choosing genuine Delta replacement parts, you can enjoy a reliable and leak-free shower faucet.
Remember, the key to a successful repair lies in investing in quality parts.
2/2 CONCLUSION
In conclusion, understanding the problem of a leaking Delta shower faucet is crucial for homeowners who want to maintain a functional and efficient bathroom. By recognizing the signs of a leak and understanding the potential causes, individuals can troubleshoot and fix the issue on their own using the step-by-step guide provided. However, for complex repairs or persistent leaks, it is recommended to call a professional plumber to ensure the problem is resolved correctly.
Additionally, by implementing regular maintenance and using quality replacement parts, homeowners can prevent future leaks in their Delta shower faucet. Overall, this article provides valuable information and guidance for addressing a leaking Delta shower faucet, catering to the search intent of users looking for a solution to this specific problem. For more informative articles on bathroom maintenance and repairs, we invite readers to explore our other related content.
If you’re unsure how to turn on the shower, check out our article “How to Turn On the Shower” for a step-by-step guide on getting the water flowing.
FAQ
Why is my Delta shower head dripping?
If the washers in your shower head are worn out or damaged, it can result in water leakage. Additionally, if the shower head itself is cracked, water will naturally leak out. Another factor to consider is improper installation of your Delta shower head, which can lead to incorrect sealing and potential leaks. It’s important to address these issues promptly to prevent any further water leakage in your shower.
What causes a shower faucet to drip?
The main reason behind a shower drip or weak flow is often a faulty shower faucet valve. As time goes by and the shower valve is used, its components start to deteriorate. The seals and gaskets wear out, while the inner parts may get clogged and corroded due to minerals present in the water. This can lead to water leakage or reduced water pressure in the shower.
How do I identify my Delta shower valve?
You can find the model number of your faucet in various places. It is usually displayed on the packaging, as well as on some faucets themselves and in the installation instructions that come with your faucet. For tub and shower faucets, it might be a bit trickier to locate the model number, but you can start by checking the wall plate beneath the handle. On the packaging, you can look near the UPC code or at the top of the box to find the model number.