Are you in the process of renovating your bathroom or commercial space and need to install a urinal ? Understanding the basics of urinal plumbing rough in is essential for a successful installation . In this article, we will guide you through the DIY process of urinal plumbing rough in, providing step-by-step instructions and tips to avoid common mistakes.
Whether you’re a DIY enthusiast or simply looking to expand your plumbing knowledge, this article will equip you with the necessary information to tackle this project. Plus, did you know that proper urinal plumbing can help conserve water and reduce utility costs? Let’s dive in and explore the world of urinal plumbing rough in together.
Summary in three points
- Understanding the basics and importance of urinal plumbing rough-in.
- A DIY guide to urinal plumbing rough-in, including tools needed and step-by-step process.
- Tips, precautions, and when to seek professional help for urinal plumbing rough-in.

1/7 Basics of Urinal Plumbing
In the realm of urinal plumbing, a proper understanding of the fundamentals is paramount. Let us embark on a journey to explore the diverse array of urinals commonly employed in plumbing installations. Ranging from wall-mounted to floor-mounted, there exists a plethora of options tailored to suit your individual needs and preferences.
Now, let us delve into the intricate connection between the urinal and the primary water supply line. This connection serves as the lifeblood, facilitating the uninterrupted flow of water into the urinal. It is typically established using secure pipes and fittings to ensure a watertight seal, thwarting any potential leaks.
Additionally, we must not overlook the significance of trap seals. These guardians of water, nestled within urinal traps, act as impenetrable barriers, warding off the intrusion of foul sewer gases into the sacred confines of a building. It is imperative to maintain and install these trap seals with utmost care to guarantee their unwavering efficacy.
By acquainting oneself with the core tenets of urinal plumbing – encompassing an understanding of the various urinal types, the intricate connection to the water supply line, and the indispensable role of trap seals – one can establish a plumbing system that operates harmoniously, free from undesirable odors. Whether embarking on a bathroom renovation or constructing a novel edifice, it is imperative to bear these factors in mind, fostering a secure and efficient plumbing system.
2/7 Importance of Rough In
Starting the process of installing a urinal may not seem glamorous, but it plays a vital role in the overall functionality and cleanliness of public restrooms or commercial buildings. Proper rough-in is the key to success, ensuring a seamless operation and preventing any potential leaks or water damage. Besides, accurate rough-in also helps keep unpleasant odors and health hazards at bay.
Don’t overlook this critical step; invest in a professional plumber to ensure optimal urinal performance and avoid any future headaches or costly repairs.
If you’re considering installing a tankless water heater, make sure to check out our article on expansion tanks for tankless water heaters to understand their importance and how they can help prolong the lifespan of your system.

Everything You Need to Know About Urinal Plumbing Rough In
- Did you know that urinal plumbing rough in is the initial phase of installing a urinal in a bathroom or commercial space?
- During the rough in process, the plumbing is installed before the walls and floors are finished, ensuring proper placement and connection of pipes.
- One important step in urinal plumbing rough in is determining the water flow. This involves calculating the water pressure and pipe size needed for optimal performance.
3/7 Tools Needed
In order to successfully tackle a urinal plumbing rough in , it is essential to have a few key tools at your disposal. First and foremost, a pipe wrench is an invaluable tool that allows you to effortlessly tighten and loosen plumbing connections. Its adjustable jaws provide a firm grip, enabling you to easily maneuver pipes and fittings without the fear of leaks or instability.
Equally important is a trusty plunger, which serves as your faithful companion in clearing clogs. A few swift plunges are often all it takes to dislodge any obstructions in the urinal plumbing, swiftly restoring the desired flow. Accurate pipe cutting is of utmost importance, so be sure to arm yourself with a reliable pipe cutter.
This tool enables you to make precise cuts, ensuring the pipes are the perfect length and fit together seamlessly. Say goodbye to the hassle of hacksaws and welcome the clean, burr-free cuts provided by a pipe cutter. By having these essential tools within reach, your urinal plumbing rough in project will become a far more manageable endeavor.
Remember to handle them with care and prioritize safety. With the right tools and a little bit of know-how, you will be well on your way to achieving a successful installation.
If you’re dealing with a leaky toilet, check out our article on Kohler toilet gasket replacement for a step-by-step guide on how to fix the issue and restore your toilet’s functionality.
Determining the Water Flow
Mastering the mechanics of water flow in urinal plumbing is crucial for peak performance. Begin by acknowledging the water pressure specifications and seeking advice from either the manufacturer or a skilled plumber. Determine the ideal water flow rate to minimize water wastage while ensuring a thorough flush.
Lastly, ensure that the water flow adheres to plumbing code regulations to prevent any potential issues down the line. By diligently adhering to these steps, your urinal plumbing system will function with utmost efficiency and effectiveness.


Boring Holes for Installation
When it comes to installing a urinal, precision is key. Ensuring proper alignment and allowing for easy pipe connections requires drilling precise holes. But fear not, with the right tools and techniques, this task can be a breeze.
The first step is to mark the correct placement for the urinal. This ensures that the holes are in the right position, providing stability and functionality. But that’s not all – you also need to consider the space needed for the pipe connections.
Creating enough room to connect the pipes without any obstructions is crucial for a smooth installation and to prevent any future issues. To achieve this, it’s important to use the appropriate tools and techniques for hole drilling. Having the right equipment will guarantee clean and accurate holes , making the installation process much easier.
By taking the time to align properly, create sufficient space, and use the right tools, you can successfully install a urinal. This step is essential for maintaining an efficient plumbing system in your building. So roll up your sleeves and get ready to tackle this task with confidence!
Setting Up the Plumbing
Crafting the Perfect Urinal Plumbing System When constructing your urinal plumbing, precision is key to achieving a flawlessly functioning system. Proper alignment of pipes is vital in ensuring a seamless water flow, preventing any obstructions or complications down the line. Additionally, securing the pipe connections is crucial to avoid any leaks.
Leaks not only result in wasted water but can also lead to costly repairs. By firmly fastening the pipes, you eliminate weak points and loose connections that could potentially cause leaks. Once the plumbing is set up, it is imperative to thoroughly test the system for functionality.
This includes checking for leaks and ensuring a consistent water flow at the desired rate. Comprehensive testing allows you to identify and address any issues before they escalate into major problems. Remember, attention to detail and meticulousness are imperative when setting up your urinal plumbing.
By focusing on proper alignment, secure connections, and rigorous testing, you can guarantee an efficient water flow and prevent any potential leaks. So take your time, follow the necessary steps, and revel in the satisfaction of a smoothly operating urinal plumbing system.

Installing a Urinal: A Step-by-Step Guide to Plumbing Rough-In
- Determine the water flow requirements for the urinal installation.
- Bore holes in the wall where the urinal will be installed.
- Install the necessary plumbing components, such as the water supply line and drain pipe.
- Connect the water supply line to the urinal’s water inlet valve.
- Attach the drain pipe to the urinal’s waste outlet.
- Secure all plumbing connections tightly to prevent leaks.
- Test the urinal by flushing water through it to ensure proper functionality.
4/7 Avoiding Common Mistakes
To achieve a flawless urinal plumbing installation, one must steer clear of common pitfalls. Firstly, meticulous alignment and secure connections of the pipes are imperative to prevent leaks and blockages. Secondly, selecting the appropriate size and type of urinal trap is crucial to ensure optimal drainage and eliminate any unpleasant odors.
Lastly, maintaining proper ventilation is essential in guaranteeing a fresh and odor-free bathroom environment. By adhering to these guidelines, a seamless and efficient urinal plumbing system can be achieved.
Plumbing Tools and Materials Table
| Tool/Material | Description |
|---|---|
| Pipe Wrench | A tool used to tighten or loosen pipes during installation or repair. It has adjustable jaws that provide a secure grip on pipes of various sizes. |
| Hacksaw | A saw used to cut pipes to the desired length during installation. It features a fine-toothed blade for clean and precise cuts. |
| Plunger | A tool used to clear clogs in the urinal drain system. It creates pressure and suction to dislodge blockages. |
| Teflon Tape | A thin white tape used to create a watertight seal on threaded connections. It is wrapped around the threads to prevent leaks. |
| Pipe Cutter | A tool used to cut pipes cleanly and efficiently during installation. It typically has a sharp cutting wheel that scores the pipe, allowing for a clean break. |
| Pipe Threader | A tool used to create or repair threaded connections on pipes. It cuts threads into the pipe, allowing for the attachment of fittings. |
| Adjustable Wrench | A versatile tool used for various plumbing tasks, such as tightening or loosening nuts and bolts. It has an adjustable jaw that can accommodate different sizes. |
| Plumber’s Putty | A soft, moldable substance used to create watertight seals around drains and fixtures. It is applied between the surfaces to be sealed, forming a tight seal when compressed. |
| PVC Primer and Cement | A combination used to join PVC pipes and fittings securely. The primer cleans and prepares the surfaces, while the cement chemically bonds them together. |
| Level | A tool used to ensure that the urinal and pipes are properly aligned and level during installation. It helps achieve a professional and visually appealing result. |
5/7 Ensuring Safety During Installation
Safety is of utmost importance when it comes to installing a urinal. It is essential to protect yourself from accidents by utilizing safety equipment such as gloves, safety glasses, and suitable clothing. Always adhere to the manufacturer’s instructions for both the urinal and plumbing components.
Ensure that electrical connections are properly grounded and insulated. If you have any doubts or uncertainties, it is always wise to seek the advice of a professional. Remember, prioritizing safety is the key to a successful and secure installation.
If you’re dealing with the frustrating issue of a toilet and tub backing up, check out our article “Toilet and Tub Backing Up” for some helpful tips and solutions to solve this problem.
6/7 Recognizing Complex Situations
When it comes to the intricate task of installing urinal plumbing , there are a multitude of challenges that must be taken into account. One particular challenge lies in the navigation of unconventional building structures or layouts. This often necessitates the exploration of alternative routes for pipes or the adjustment of the urinal’s placement to accommodate the unique structure.
Additionally, it is crucial to acknowledge the requirement for specialized tools or techniques. The installation of complex systems may demand the utilization of tools that are not typically employed in standard plumbing jobs. For instance, in cases where there is limited space for pipe connections within a building, the use of specialized tools becomes indispensable in order to secure the pipes in tight spaces.
In essence, the successful execution of complex urinal plumbing installations hinges upon the ability to identify potential obstacles, navigate through the intricacies of unique building structures, and recognize the indispensability of specialized tools. By taking these factors into consideration, professionals in the field can approach even the most challenging of installations with unwavering confidence, ensuring triumphant outcomes.

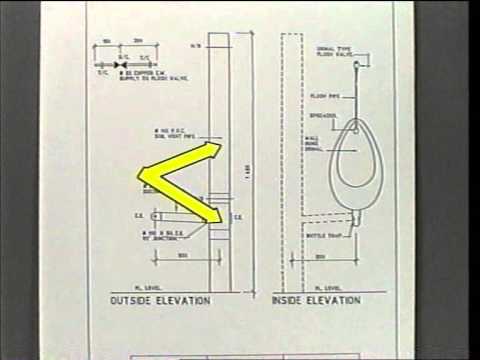
If you’re looking to install a wall hung urinal, this old video is just what you need. Learn how to navigate the urinal plumbing rough-in process with expert tips and tricks. Get ready to tackle this project like a pro! #urinalinstallation #plumbingtips #DIY
7/7 Benefits of Hiring a Professional Plumber
Imagine a world where every plumbing installation is flawlessly executed, leaving no room for leaks or breakdowns. In this utopia, professional plumbers reign supreme, armed with their specialized tools and unrivaled expertise. With their knowledge of complex building structures and their ability to conquer any challenge, these skilled individuals ensure that every project is completed with utmost precision and efficiency.
By entrusting your plumbing needs to these masters of their craft, you can rest assured that your installation will be nothing short of perfection . So, why settle for anything less than the best? Call in the experts and experience the wonders of a seamless and stress-free plumbing project.
CONCLUSION
In conclusion, understanding the process of urinal plumbing rough in is essential for anyone looking to tackle this DIY project . By following the step-by-step guide and using the necessary tools, individuals can successfully install a urinal in their bathroom or commercial space. It is important to avoid common mistakes and prioritize safety during the installation process.
However, for complex situations or if unsure about the process, it is recommended to seek professional help from a plumber. This article has provided valuable information and tips for readers, ensuring they have the necessary knowledge to complete the urinal plumbing rough in. For more helpful articles on plumbing and home improvement projects, we encourage readers to explore our other resources.
FAQ
What is the rough in height for a urinal drain?
The outlet detail for this urinal is 9-1/2″ (241 mm). It is important to note that this urinal is designed to comply with ADA requirements. To meet these requirements, the rim of the urinal should be mounted no higher than 17″ (432 mm) from the finished floor. This ensures accessibility for individuals with disabilities.
What is the standard height for urinal mounting?
The typical height requirement for a wall-mounted urinal in a standard home is 24 inches. This is the recommended height for comfortable and convenient use.
Does urinal need to be vented?
Waterless urinals, which do not require the use of water, still need to be vented. They are connected to a large pipe that releases sewer gases through a vent located on the roof or outside the facility. This ensures proper ventilation and prevents unpleasant odors from accumulating.
What size drain pipe for a urinal?
Sink, soda fountain, or bar fixtures require a minimum trap and fixture drain size of 1 1/4 inches. For urinal stalls, the minimum size is 2 inches, while urinal troughs and wall urinals require a minimum size of 1 1/2 inches.