Are you concerned about the gap between your bathroom vanity and the wall? The ” gap between bathroom vanity and wall ” is a small detail that many homeowners often overlook , but it can have significant consequences if left unaddressed. In this article, we will explore why filling the gap is important, the potential problems it can cause, and ways to avoid and fill the “gap between bathroom vanity and wall” effectively.
Whether you’re dealing with uneven walls, poor installation, or material expansion, we’ve got you covered. So, let’s dive in and discover how to bridge the “gap between bathroom vanity and wall” for a seamless and visually appealing bathroom space.
If you’re dealing with a frustrating 2 inch gap between your vanity and the wall, check out our article “How to Fix a 2 Inch Gap Between Vanity and Wall” to find easy solutions and tips to make it vanish.
In three sentences: The essentials in a nutshell
- The importance of filling the gap between the bathroom vanity and wall to avoid potential problems caused by the gap.
- Understanding the causes of the gap, including uneven walls, poor installation, and material expansion.
- Ways to avoid and fill the gap, such as proper installation techniques, choosing the right vanity size, using caulk, bathroom sealant tape, backer rod, backsplash, or alternative solutions like installing a vanity filler strip, tiling the sidewall, or adding a shelf or side cabinet.

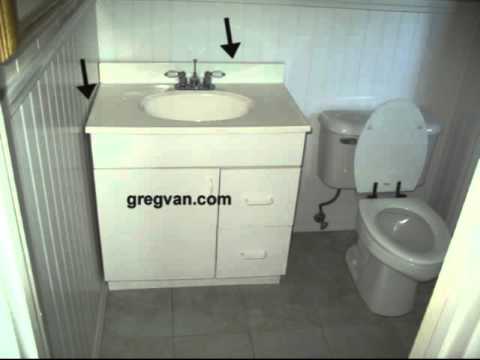
1/17 Why You Should Be Concerned About the Gap
In the depths of your bathroom, hidden from sight, lies a treacherous gap that harbors unseen dangers. A small crevice between your vanity and the wall, innocuous at first glance, has the potential to unleash havoc upon your sacred oasis. Water, that cunning infiltrator, finds its way into this gap, creeping stealthily into the very heart of your walls.
Unbeknownst to you, it nourishes the growth of a silent menace: mold . With each passing day, this insidious invader spreads its tendrils, threatening not only the structural integrity of your abode but also your peace of mind. But the perils do not end there.
The gap, like a magnet, attracts a motley crew of unwanted guests. Dirt, dust, and bugs gather with impunity, defiling the cleanliness of your sanctuary. Their presence, an affront to your meticulously curated space, undermines your efforts to create a haven of serenity.
Maintenance and repairs become a herculean task, as reaching this crevice of chaos proves to be an arduous endeavor. The vanity, once a symbol of beauty and functionality, now becomes a barrier to your quest for order. Time and resources are wasted, as the gap mocks your feeble attempts to restore harmony.
Fear not, dear reader, for there is a way to shield yourself from this relentless assault on your tranquility. Install and seal your vanity with utmost care, leaving no room for water to invade. Regularly cleanse and maintain this forgotten realm, banishing the dirt and detritus that seek refuge.
By heeding this humble advice, you shall reclaim your bathroom as a sanctuary of cleanliness and allure. No longer shall the gap conspire against you, for you have taken a stance against its malevolence. Let your bathroom be a testament to your triumph over the forces that seek to disrupt your peace.

2/17 The Potential Problems Caused by Ignoring the Gap
Overlooking the space between your bathroom vanity and the wall can have serious consequences. It can result in water damage , causing the vanity to weaken or even collapse, while also harming the wall. Neglecting this gap can also attract pests and insects, posing health risks.
Moreover, it can complicate the process of accessing and fixing plumbing and electrical systems. By addressing this issue, you can prevent expensive repairs and ensure that your bathroom remains in top condition.
3/17 Uneven Walls
Gaps between your bathroom vanity and the wall can be more than just a cosmetic concern. Uneven walls can pave the way for moisture to infiltrate, leading to water damage, mold growth , and even structural instability. Repair costs and mold remediation can quickly escalate if left unchecked.
To safeguard your bathroom, it’s crucial to tackle the root cause – uneven walls . By leveling the walls or employing techniques like shimming, you can create a smoother surface and minimize the risk of gaps. Don’t underestimate the impact of uneven walls.
Act now to preserve the beauty and functionality of your bathroom . Say goodbye to potential water damage , mold growth, and compromised structural integrity. Take control today and revel in the seamless and secure connection between your vanity and the wall.
4/17 Poor Installation
Inadequate installation can have a detrimental impact on the stability of your bathroom vanity. This can result in unsightly gaps between the vanity and the wall, which may lead to water damage and the growth of mold . One common cause of these gaps is inaccurate measurements taken during the installation process.
If the vanity is not measured correctly, it will not fit snugly against the wall, leaving gaps through which water can seep, causing damage to both the vanity and the wall. To prevent these issues from arising, it is crucial to enlist the services of a professional for vanity installation. Professionals possess the expertise and experience necessary to ensure a proper and secure installation.
They will take precise measurements and make any necessary adjustments to guarantee a tight fit against the wall. By opting for professional assistance, you can greatly reduce the risk of gaps and potential water damage. A properly installed vanity not only enhances the stability and functionality of your bathroom, but also elevates its overall aesthetic appeal.
Therefore, investing in professional installation is a prudent choice, sparing you the hassle and expense of dealing with subpar installation in the long run.

Closing the Gap: How to Address the Space Between Your Bathroom Vanity and Wall
- The gap between the bathroom vanity and wall may seem like a small detail, but it plays a significant role in the overall aesthetics and functionality of your bathroom.
- Ignoring the gap can lead to potential problems such as water damage, mold growth, and an overall unappealing appearance.
- The causes of the gap can vary, including uneven walls, poor installation techniques, and material expansion.
- To avoid a gap, it’s important to ensure proper installation techniques are used and choose the right vanity size for your space.
- If a gap does exist, there are several ways to fill it, including using caulk, bathroom sealant tape, backer rod, or applying a backsplash.
5/17 Material Expansion
The Mysterious Reason Behind Bathroom Gaps Have you ever wondered why there’s an annoying gap between your bathroom vanity and the wall? Well, it turns out that material expansion might be the culprit. You see, when the temperature and humidity change, certain materials have a tendency to expand and contract, leaving behind those unsightly gaps.
Not only do these gaps ruin the overall look of your bathroom, but they can also lead to water damage and the growth of mold . Thankfully, there are ways to prevent these gaps from appearing. One solution is to choose materials that are resistant to expansion.
Solid wood or engineered wood with a moisture-resistant finish are excellent options. But that’s not all – proper sealing techniques are also crucial. By applying a high-quality caulk or sealant along the edges of your vanity, you can create a watertight barrier that keeps those gaps at bay.
By addressing the issue of material expansion, you can transform your bathroom vanity into a seamless and visually pleasing masterpiece. Say goodbye to gaps and say hello to a bathroom that not only looks great but also stands the test of time. So, the next time you’re planning a bathroom remodel or thinking about replacing your vanity, make sure to prioritize materials that resist expansion and sealing techniques.
Achieving a successful and durable bathroom vanity installation requires employing the right methods. Before attaching it to the wall, it is crucial to ensure that the vanity is level to prevent any instability or wobbling. This step is of utmost importance as it guarantees stability and safeguards against potential damage.
Furthermore, securing the vanity to the wall is imperative to maintain stability and prevent any gaps that could result in water damage, mold growth, or unwanted pests. By firmly fastening it, you not only create a visually pleasing bathroom space but also minimize any structural issues that may arise. Equally important is properly sealing the edges with a waterproof sealant.
This essential step serves as a barrier , preventing water from seeping in and causing harm to both the vanity and the surrounding walls, especially in areas with high moisture. By adhering to these installation techniques , you can ensure that your bathroom vanity remains stable, securely in place, and well-protected against water damage . Whether you embark on this project as a DIY enthusiast or opt to hire a professional, proper installation techniques are paramount in creating a functional and aesthetically pleasing bathroom space.
6/17 Choosing the Right Vanity Size
When it comes to choosing the perfect vanity size for your bathroom, there are a few key factors to consider. The dimensions of your bathroom play a crucial role in determining the right size. You don’t want a vanity that overwhelms the space or lacks storage .
In addition to dimensions, the height of the vanity is important for everyday use. It should be at a comfortable level to prevent strain on your back and avoid excessive bending when using the sink. Ultimately, finding the ideal vanity size is a delicate balance between functionality and aesthetics.
It should meet your storage needs while enhancing the overall design of your bathroom . Take the time to measure your bathroom and carefully consider your personal preferences before making a final decision .

Step-by-step Guide on How to Use Caulk
Transforming the space between your bathroom vanity and the wall can be effortlessly achieved with the help of caulk . Here’s a step-by-step guide to get you started:
1. Begin by thoroughly cleaning the area, ensuring that all debris, dust, and old caulk are removed. A scraper or putty knife can be used for this task.
Use a mild detergent and water to wash the area, and allow it to dry completely.
2. To apply the caulk precisely, utilize a caulk gun. Cut the tip of the caulk tube at a 45-degree angle. Apply a thin line of caulk along the gap, making sure not to exert excessive pressure.
3. Achieve a seamless finish and optimal adhesion by smoothing out the caulk with a caulking tool or your finger. This step guarantees a polished appearance.
4. Before using the vanity or exposing it to water, allow the caulk to dry and cure according to the manufacturer’s instructions. This will ensure long-lasting protection against potential water damage and the growth of mold. By following these straightforward steps, you can effortlessly fill the gap between your bathroom vanity and the wall with caulk.
This simple and effective solution not only enhances the aesthetics of your bathroom but also safeguards against possible water damage and the growth of mold.
Did you know that the average gap between a bathroom vanity and the wall is about 1/4 of an inch?

7/17 Using Bathroom Sealant Tape for Small Gaps
Introducing a revolutionary solution for those pesky gaps in your bathroom – bathroom sealant tape. This incredible tape is not only easy to use but also guarantees a watertight seal, keeping water at bay. With its waterproof and moisture-resistant properties, bathroom sealant tape is a durable and long-lasting solution.
It effortlessly protects your vanity from water damage, standing the test of time. Applying the tape is a breeze – simply clean and dry the area, peel off the backing, and firmly press the tape onto the gap. Smooth out any imperfections for a flawless finish.
In conclusion, if you’re looking for a practical and effective way to tackle small gaps in your bathroom, look no further than bathroom sealant tape. It’s the perfect solution for a seamless and water-resistant result.

8/17 Employing Backer Rod for Medium Gaps
Enhance your bathroom’s beauty and durability effortlessly with the remarkable backer rod. This innovative foam rod not only fills those bothersome gaps, but also shields against water damage and mold. With its exceptional sealing properties, backer rod keeps moisture at bay, ensuring your bathroom remains safeguarded.
Easily installed and water-resistant, it’s the ideal solution for preventing future mold growth and water-related woes. Embrace the backer rod to elevate your bathroom’s allure and longevity.
9/17 Applying Backsplash for Larger Gaps
Transform your bathroom into a stunning masterpiece with the magic of a backsplash . Not only does it bring style to your space, but it also offers practical advantages. Say goodbye to unsightly gaps and hello to a seamless transition that shields your walls from water damage .
With a plethora of materials to choose from, you can find the perfect balance of aesthetics and durability. Installing a backsplash may seem daunting, but with the right technique, it’s a breeze. Measure, cut, and apply adhesive for a transformation that will leave your bathroom looking effortlessly chic and well-preserved.
How to Fill the Gap Between Your Bathroom Vanity and the Wall
- Measure the gap between the bathroom vanity and the wall using a tape measure.
- Choose the appropriate filler material based on the size of the gap.
- If the gap is small, use caulk to fill it. Apply the caulk using a caulk gun, making sure to fill the entire gap.
- If the gap is slightly larger, use bathroom sealant tape. Cut the tape to the desired length and press it into the gap, smoothing it out with your finger.
- For medium-sized gaps, use a backer rod. Insert the backer rod into the gap, ensuring it fits tightly. Trim any excess rod if necessary.
- If the gap is large, consider adding a backsplash to cover it. Measure the dimensions of the gap and choose a suitable backsplash material. Install the backsplash according to the manufacturer’s instructions.
- Alternatively, you can install a vanity filler strip, tile the sidewall, or add a shelf or side cabinet to fill the gap.
10/17 Installing a Vanity Filler Strip
Enhance Your Bathroom’s Beauty with a Vanity Filler Strip Transform your bathroom with the perfect finishing touch – a vanity filler strip. Not only will it add a touch of elegance to your space, but it will also safeguard against water damage and mold growth . Installing a vanity filler strip is a breeze.
Measure the gap , cut the strip to size, and secure it with adhesive or screws. The result? A seamless blend with your bathroom decor that will leave you in awe.
Beyond its aesthetic appeal, the vanity filler strip acts as a protective shield. By closing the gap, it prevents water from wreaking havoc on your vanity and the wall. Bid farewell to the worries of mold and mildew, as your bathroom becomes a healthier sanctuary.
So, why wait? Embrace the simplicity and effectiveness of a vanity filler strip for your bathroom gap. Elevate your space with a stunning finish while safeguarding it from water damage and mold.
Say hello to a bathroom you’ll proudly show off .

11/17 Tiling the Sidewall
Transform your bathroom into a sanctuary of beauty and functionality by embracing the art of tiling the sidewall. No longer will you have to endure the unsightly gap between your vanity and the wall, for tiling provides a seamless and elegant solution. But the benefits go far beyond mere aesthetics.
By creating a protective barrier against the ravages of water damage , you can safeguard the structural integrity of your bathroom. Moisture buildup is an all too common issue, but with the power of tiles , you can conquer this threat with ease. Not only are tiles a practical choice, but they also possess the remarkable ability to resist stains, ensuring a cleanliness that is unmatched.
So, why not embrace the practical and stylish solution of tiling the sidewall? Elevate your bathroom to new heights of sophistication and tranquility.
12/17 Adding a Shelf or Side Cabinet
Transforming your bathroom into a well-organized and stylish haven is easier than you think. By adding a shelf or side cabinet , you can enhance the functionality of your space while keeping it clutter-free. Not only will this practical solution provide extra storage, but it will also elevate the overall aesthetic of your bathroom.
With a variety of styles and materials to choose from, you can effortlessly find the perfect fit for your existing decor. Say goodbye to the days of searching for misplaced toiletries and towels, and say hello to a neat and effortlessly chic bathroom. Maximize your storage space and upgrade your bathroom today with a simple addition that will make a world of difference.
Are you experiencing gaps between your bathroom vanity and the wall? Don’t ignore them! Learn how to prevent mold, mildew, and water damage with this informative video.
13/17 Is Caulk or Grout Better for Filling Gaps?
When deciding how to fill the gaps between your bathroom vanity and the wall, you have two options: caulk or grout. Caulk is a flexible and easy-to-use solution that dries quickly. It effectively seals gaps, prevents water damage , and inhibits mold growth .
However, it may not be as long-lasting as grout and can shrink over time. On the other hand, grout is a solid and durable choice that resists cracking and shrinking. It provides a seamless appearance but requires more time to apply and dry.
To make the right choice, consider the size of the gap, desired durability, and maintenance level. If you have small gaps and prefer easier maintenance, caulk is the way to go. For larger gaps and long-lasting durability, grout is the better option.
Ultimately, choose the solution that aligns with your specific needs and preferences.

14/17 What Causes Gaps Between Bathroom Vanity and Wall?
Inadequate installation, ventilation, and misaligned fixtures can result in gaps between the bathroom vanity and the wall. These gaps may lead to water damage, mold growth, and structural problems if left unattended. To preserve your bathroom’s integrity and prevent further harm, it is crucial to conduct regular inspections, ensure proper installation, and promote sufficient ventilation.
15/17 Which Caulk is Ideal for Bathroom Vanities?
When it comes to your bathroom vanities, the choice of caulk is absolutely crucial. With various types available, such as silicone, acrylic, and latex, it’s vital to select the right one for your needs. One of the key factors to consider is the caulk’s ability to resist moisture and mold.
Given the high levels of humidity in bathrooms, it’s essential to choose a caulk that can withstand constant exposure to water. Look for products specifically labeled as mold-resistant to prevent the growth of unsightly mildew. Another important consideration is durability.
Bathroom vanities face regular cleaning and heavy usage, so the caulk you choose must be able to endure this without cracking or peeling. Opting for a high-quality, flexible caulk will yield the best results in the long run. By taking into account factors like suitability, resistance to moisture and mold, and durability, you can find the perfect caulk for your bathroom vanities.
This will not only keep your vanity in excellent condition but also prevent any water damage or mold growth that could potentially arise.
Causes and Solutions for Gaps Between Bathroom Vanity and Wall – Tabelle
| Cause | Description | Solution |
|---|---|---|
| Uneven Walls | Walls not being perfectly straight or level can create gaps between the vanity and the wall. | Use shims or spacers during installation to ensure a flush fit. Alternatively, consider using a scribe molding or trim to cover the gaps. |
| Poor Installation | If the vanity is not properly aligned or secured to the wall, gaps may occur. | Follow manufacturer’s instructions carefully or hire a professional for installation to ensure proper alignment and secure attachment. |
| Material Expansion | Natural expansion and contraction of vanity materials due to temperature and humidity changes can lead to gaps. | Leave adequate gaps during installation to accommodate material expansion. Consider using flexible caulk to fill small gaps that may occur. |
| Proper Installation Techniques | Steps and best practices for correctly installing a bathroom vanity. | 1. Level the vanity using a spirit level to ensure it is straight. 2. Secure the vanity to the wall using appropriate screws or brackets. 3. Use a silicone adhesive to bond the vanity top to the base. 4. Install backsplash if necessary. 5. Seal any gaps with caulk or grout for a finished look. |
| Choosing the Right Vanity Size | Importance of selecting a vanity that fits the available space without leaving excessive gaps. | 1. Measure the available space accurately. 2. Consider the location of plumbing fixtures. 3. Choose a vanity size that provides functional storage without overcrowding the space. 4. Leave some clearance between the vanity and other fixtures for easy access and cleaning. |
| Using Caulk to Fill Small Gaps | Using caulk as a sealing agent to fill small gaps between the vanity and the wall. | 1. Clean the gap and remove any debris. 2. Cut the caulk tube nozzle at a 45-degree angle. 3. Apply a thin and even bead of caulk along the gap. 4. Use a caulk smoothing tool or a wet finger to smooth the caulk. 5. Wipe away excess caulk with a damp cloth. 6. Allow the caulk to dry and cure according to the manufacturer’s instructions. |
| Installing a Vanity Filler Strip | Adding a decorative strip or trim to cover the gap between the vanity and the wall. | 1. Measure the width and height of the gap. 2. Select a filler strip that matches the material and finish of the vanity. 3. Cut the filler strip to the appropriate size. 4. Attach the filler strip using adhesive or small nails. 5. Sand and paint/stain the filler strip to match the vanity. |
| Tiling the Sidewall | Extending the tile from the vanity countertop to the wall to eliminate the gap. | 1. Measure the width and height of the gap. 2. Cut the tiles to fit the gap, accounting for any necessary spacing. 3. Apply tile adhesive to the back of the tile and press it firmly onto the wall. 4. Use tile spacers to ensure even spacing between tiles. 5. Allow the adhesive to dry. 6. Grout the tiles, ensuring full coverage and removing excess grout. 7. Clean the tiles with a damp sponge to remove any grout residue. |
| Adding a Shelf or Side Cabinet | Utilizing additional storage units to bridge the gap and create a cohesive design. | 1. Measure the width and height of the gap. 2. Select a shelf or side cabinet that complements the vanity design. 3. Install the shelf or side cabinet next to the vanity using appropriate screws or brackets. 4. Ensure the shelf or side cabinet is level and securely attached. 5. Arrange items on the shelf or in the side cabinet to create an organized and visually pleasing display. |
| Caulk vs. Grout for Filling Gaps | Differences between caulk and grout and their suitability for filling gaps. | Caulk: – Flexible and waterproof material suitable for sealing small gaps. – Available in a variety of colors to match different surfaces. – Easy to apply and reapply if necessary. Grout: – Cement-based material used for filling larger gaps between tiles. – Provides a more rigid and durable finish. – Available in different colors to match the tile. – Requires proper mixing and application techniques for best results. – May need periodic sealing to prevent staining and water penetration. |
| FAQ: Frequently Asked Questions | Common queries related to gaps between bathroom vanity and wall. | 1. What is the maximum gap size that can be filled with caulk? – Most caulks can fill gaps up to 1/4 inch. If the gap exceeds this size, consider using a filler strip or trim. 2. Should I seal over the caulk after application? – It is not necessary to seal over the caulk after application. However, if desired, you can use a clear silicone sealant to provide additional protection and a polished look. |
16/17 How Large of a Gap Can Be Filled with Caulk?
Choosing the correct caulk is essential when filling the space between your bathroom vanity and the wall. It is important to select a caulk specifically designed for bathrooms, as it should be resistant to moisture and mold. Ideally, the maximum size of the gap should be around 1/4 inch.
If the gap is larger than this, you may need to consider alternative solutions such as a backsplash or vanity filler strip. Attempting to fill larger gaps with caulk can be risky, as it may not adhere properly and create a weak seal. This can result in water damage , the growth of mold, and potential structural issues.
It is crucial to take these factors into consideration in order to ensure that the gap is properly sealed and protected.
If you’re curious about the cost to replace a toilet flange, check out our article on how much it typically costs and what factors can affect the overall expenses.
17/17 Is It Right to Seal Over the Caulk?
Ensuring the longevity of your bathroom vanity requires diligent maintenance and resealing of caulk. Over time, caulk can deteriorate , leading to gaps that allow water to seep through. Instead of simply sealing over old caulk, it is important to consider a few key factors.
Sealing over old caulk can create a stronger and more waterproof barrier , especially if the existing caulk is cracked or peeling. By applying a fresh layer of caulk, you reinforce protection against water damage and prevent the formation of gaps. This is particularly crucial in areas of high moisture, such as the bathroom.
Regular inspections and touch-ups are essential for preventing gaps and water damage. It is important to regularly check the caulk for wear and damage, addressing any issues that arise. Touching up worn-out areas helps maintain the integrity of the caulk and prevents water leaks.
Always remember, proper maintenance and regular resealing of caulk are vital for preserving the seal of your bathroom vanity. By taking a proactive approach, you can ensure a secure and waterproof barrier that keeps your vanity and its surroundings free from the damaging effects of water.

CONCLUSION
In conclusion, filling the gap between the bathroom vanity and wall is an important step in ensuring a well-functioning and aesthetically pleasing bathroom space. Ignoring this gap can lead to potential problems such as water damage , mold growth, and an overall unfinished appearance. By understanding the causes of the gap, such as uneven walls and poor installation, and implementing proper installation techniques and choosing the right vanity size, one can avoid the gap altogether.
However, if a gap does exist, there are various methods to fill it, including using caulk, bathroom sealant tape, backer rod, or applying a backsplash. Additionally, alternative solutions such as installing a vanity filler strip, tiling the sidewall, or adding a shelf or side cabinet can be considered. When it comes to choosing between caulk and grout for filling gaps, caulk is generally the preferred option due to its flexibility and water-resistant properties.
Overall, by addressing the gap between the bathroom vanity and wall, one can create a more functional and visually appealing bathroom space. For more helpful articles on bathroom remodeling and maintenance , we recommend exploring our other resources on various topics related to home improvement and interior design.
If you’re tired of dealing with that unsightly ring in your toilet, check out our article on how to get rid of a ring in the toilet for some practical tips and tricks to make your toilet sparkling clean again.
FAQ
How do I close the gap between my bathroom vanity and wall?
To prevent any accidental spills on the vanity surface, it is advisable to cover the top edge of the vanity with painter’s tape. Not only does this protect the surface, but it also assists in achieving a clean and defined line. Additionally, it is recommended to seal any small gaps using caulk. In cases where there are medium-sized gaps, using a backer rod can provide added support and security. These tips can help enhance the overall appearance and longevity of your vanity.
Should I leave a gap between vanity and wall?
When installing a vanity, regardless of its size, it is important to ensure it is properly aligned with the wall to eliminate any gaps. However, it is worth noting that for freestanding or floating vanities, a gap of approximately 4 inches is considered acceptable.
How much space do you need behind a bathroom vanity?
For optimal placement, it is recommended to position bathroom sinks 20 inches away from the back wall. However, the minimum distance should be at least 15 inches. This measurement is taken from the center point of the sink to the wall.
How do you fill a gap between a bath and a wall?
You can also consider using flexible caulking strips as an alternative. These self-adhesive strips can be easily cut to fit the gap between your bath and the wall. By doing so, they provide the same beneficial impact as a sealant. This option offers flexibility and convenience for sealing the gap effectively.