Are you experiencing a leak in your anti-siphon valve? If so, you’ve come to the right place. In this article, we will delve into the functionality of anti-siphon valves, their role in plumbing, and most importantly, how to identify and repair leaks in these anti siphon valves.
Whether you’re a homeowner or a professional plumber, understanding the causes of anti siphon valve leaks and knowing the steps to fix them can save you time, money, and potential water damage. So, if you’ve been searching for answers on why your anti siphon valve is leaking, keep reading to gain valuable insights and practical solutions.
Are you dealing with a frustrating 2 inch gap between your vanity and the wall? Check out this helpful article on how to fix and fill that annoying gap once and for all!
Quick check: the highlights of the article
- Anti-siphon valves prevent siphoning of water in plumbing systems.
- Leaks in anti-siphon valves can be identified through common signs and have various causes.
- Repairing leaky anti-siphon valves may require specific tools and steps, but professional help may be needed in some cases.

1/11 How Anti-Siphon Valves Work
Imagine a world where our water sources are vulnerable to contamination, where backflow can easily occur and compromise the safety of our drinking water. In the midst of this potential danger, there exists a humble hero – the anti-siphon valve. This unassuming device, often overlooked and underappreciated, plays a vital role in our plumbing systems, diligently working to prevent backflow and protect our precious water resources.
The concept behind anti-siphon valves is simple yet ingenious. They allow water to flow in one direction, but the moment there is a drop in pressure, they swiftly spring into action, closing off the flow and preventing any unwanted contaminants from infiltrating our water supply. It is through their unwavering vigilance that we can rest assured that the water we consume is safe and untainted.
But how do these valves accomplish such a crucial task? Enter the air gap, a small yet mighty barrier that acts as the first line of defense against backflow. By creating a physical separation between the water source and the potential contaminants, it establishes an impenetrable safeguard, ensuring that any reverse flow is halted in its tracks.
Yet, the effectiveness of anti-siphon valves relies not only on their inherent design but also on their proper installation and maintenance. Placed at the highest point in the system, they stand as sentinels, ready to defend our water from any impending danger. Additionally, ensuring the correct sizing and secure connections further enhances their functionality, guaranteeing that they operate at peak performance.
In a world where clean water is a precious resource, understanding and appreciating the role of anti-siphon valves is of utmost importance. By embracing their significance and taking the necessary steps to ensure their proper installation and maintenance, we can actively contribute to the preservation of our water sources and protect the health and well-being of future generations. Let us not underestimate the power of these unassuming guardians and the profound impact they have on our lives.

2/11 The Role of Anti-Siphon Valves in Plumbing
In the realm of plumbing systems, there exists a vital guardian known as the anti-siphon valve. Its purpose, noble and unwavering, is to safeguard water from heedless wastage caused by backflow and leaks. Not only does it serve as a stalwart defender of our precious water sources, but it also acts as an impenetrable shield against the nefarious advances of pollutants.
In the realm of construction, these valves are not mere suggestions but resolute mandates, ensuring compliance with building codes and regulations. Their significance, however, extends far beyond the realm of rules and regulations. They are the unsung heroes silently upholding the efficiency, safety, and conservation of our plumbing systems, all the while safeguarding the health of the public.
How to Fix a Leaky Anti-Siphon Valve: A Step-by-Step Guide
- Anti-siphon valves are designed to prevent the backflow of contaminated water into the main water supply.
- These valves work by creating a barrier of air that prevents the flow of water in the reverse direction.
- Anti-siphon valves are commonly used in outdoor plumbing systems, such as irrigation systems and hose bibs.
- Leaking anti-siphon valves can be identified by signs such as water pooling around the valve, constant dripping, or low water pressure.
- The most common causes of anti-siphon valve leaks are worn-out seals, loose fittings, or damage to the valve body.
- To repair a leaky anti-siphon valve, you may need tools such as pliers, a wrench, and Teflon tape.
- Follow a step-by-step guide to fix a leaky valve, including shutting off the water supply, disassembling the valve, replacing any damaged parts, and reassembling the valve.
- If you are unsure or uncomfortable with repairing the valve yourself, it’s best to call a professional plumber to avoid further damage or potential water contamination.
3/11 Common Signs of Leaks
Water pooling, decreased pressure, and hissing or dripping sounds all point to a leaky anti-siphon valve . These signs should not be taken lightly, as they can indicate potential issues within the plumbing system. It is crucial to act promptly in order to prevent further damage from occurring.
When water pools around the valve, it is a clear indication of a leak. This could be caused by corrosion, damaged seals, or faulty installation. By addressing this issue promptly, you can prevent water damage and contamination.
If you notice a decrease in water pressure throughout your home, it could be a result of a valve leak or a plumbing blockage. This can affect the efficiency of your system and may lead to more serious problems if left unattended. The hissing or dripping sounds coming from the valve are undeniable signs of a leak.
It is important to investigate and fix the source of the leak in order to prevent further damage and water wastage. If any of these signs are present, it is crucial to take immediate action . Repairing the valve may involve disassembly, cleaning, lubrication, or replacing damaged parts.
If you are unsure of how to proceed, it is always best to seek professional help. By staying vigilant and addressing leaks promptly, you can preserve the integrity of your plumbing system, conserve water, and prevent water contamination.

4/11 Causes of Anti-Siphon Valve Leaks
The sinister secret behind the betrayal of anti-siphon valves lies hidden in the shadows of corrosion and rust. Like a silent assassin, moisture and chemicals slowly corrode the once sturdy metal components, leaving behind a trail of destruction and leaks that threaten to disrupt the delicate balance of water flow. Vigilance is the key to salvation, as regular inspections become a crucial ritual in the battle against decay.
Replace the corroded and damaged parts promptly, for in their absence lies the promise of a leak-free existence. But the treachery does not end there. Worn-out seals and gaskets, once reliable guardians of watertight sanctity, lose their vigor as time mercilessly takes its toll.
Age, the relentless exposure to chemicals, and the burden of excessive pressure gradually erode their strength, leaving them vulnerable to the enemy within. The only defense lies in the constant vigilance of the caretaker. Regular checks for signs of wear and damage are a necessity.
Replace them if they bear the scars of battle, for their sacrifice will ensure a watertight haven. Yet, even the most valiant efforts may be in vain if the installation is flawed or if the connections falter. The echoes of improper installation reverberate through the system, providing an opening for the enemy to strike.
Follow the sacred instructions bestowed by the manufacturer, for they hold the key to a secure and sealed destiny. Ensure that every connection is fortified and properly sealed, for the strength of the chain lies in the unity of its links. In the quest to conquer the treachery of anti-siphon valve leaks, one must be relentless.
Water wastage and the contamination of precious sources hang in the balance. Regular maintenance, timely repairs, and the sacred rite of proper installation are the weapons wielded by the vigilant. Let not the enemy prevail, for the fate of water’s purity lies in our hands.

5/11 Tools Needed for Repair
To successfully mend leaky anti-siphon valves, equipping yourself with the appropriate tools is essential. Here’s a comprehensive list of what you’ll require:
1. Adjustable wrench: This versatile tool proves indispensable in loosening and tightening the valve’s nuts and bolts, ensuring a secure fit.
2. Screwdriver set: Choose a set that encompasses various sizes and types, including flathead and Phillips, enabling you to effortlessly remove screws and access the valve’s internal components.
3. Pipe wrench: The pipe wrench is an absolute necessity when it comes to firmly gripping and turning pipes, facilitating the disconnection and reconnection of the valve with ease. Furthermore, it may be necessary to obtain specialized valve repair kits and replacement parts such as O-rings, seals, gaskets, and springs. Designed specifically for repairing leaks in anti-siphon valves, it is crucial to procure the correct parts tailored to your specific valve model.
Never underestimate the importance of safety precautions! As you will be dealing with water and potentially hazardous substances, ensure your own protection by donning safety goggles, gloves, and a waterproof apron. Armed with these indispensable tools and safety gear, you will be fully prepared to effectively repair your anti-siphon valves, guaranteeing their optimal functionality.
Always remember to adhere to safety protocols and seek professional assistance if necessary.

6/11 Step-by-Step Guide to Fixing a Leaky Valve
Repairing a leaky valve is a simpler task than you might imagine. Begin by identifying the precise location of the leak, which can be achieved by examining the valve for any signs of water accumulation or dripping. Once the leak has been located, disassemble the valve to gain access to the defective components.
It is crucial to keep track of each piece as you proceed. Subsequently, employ a cleaning solution or vinegar to thoroughly cleanse and lubricate the valve. This will eliminate any debris or buildup that may be responsible for the leakage, ensuring smooth and efficient operation.
Upon completion of the cleaning process, reassemble the valve with meticulous care, ensuring a secure and snug fit for all components. Exercise caution and refrain from overtightening screws or nuts, as this may result in damage. By diligently adhering to these steps, you will successfully rectify the issue with your leaky valve, restoring it to its former functionality.
Patience and thoroughness are key in this endeavor.
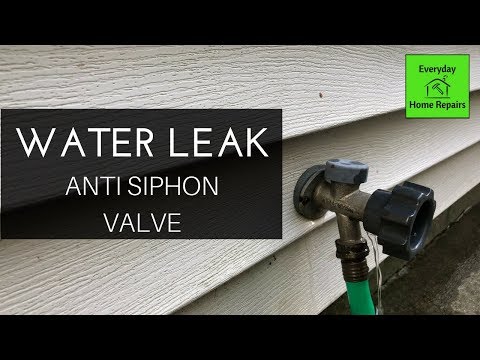
If you’re dealing with a water leak in your outdoor faucet’s anti-siphon valve, don’t worry. Our video guide will show you how to fix it step-by-step.
7/11 When to Call a Professional
When it comes to anti-siphon valve leaks, there are clear signs that indicate the need for professional assistance. If you notice persistent water pooling, decreased water pressure, or hear audible hissing or dripping sounds, it’s time to call in a professional plumber . Hiring an expert in the field offers numerous benefits, including their expertise, time and cost savings, as well as guarantees for a job well done.
Attempting DIY repairs can result in further damage, safety hazards, and even legal compliance issues. It’s best to leave the repairs to the professionals to ensure your valve functions properly and lasts for a long time.
If you’re dealing with a washing machine drain sink, check out our article on how to fix a clogged drain in your washing machine sink for some helpful tips and solutions.

8/11 Maintenance Tips
Maintaining your anti-siphon valve is vital to ensure its proper functioning and prevent any leakage. To assist you in this endeavor, here are a few quick and effortless tips to keep your valve in top-notch condition. Firstly, it is crucial to regularly inspect the valve for any signs of damage, such as cracks or leaks.
Should you encounter such issues, it is imperative to address them promptly to prevent any further complications. Secondly, flushing the valve on a regular basis is essential to eliminate debris and sediment that may lead to blockages and decrease efficiency . By turning off the water supply and opening the valve, you can allow any trapped debris to be flushed out effectively.
Lastly, it is advised to check and adjust the pressure settings of the valve whenever necessary. Employing a pressure gauge, measure the pressure both before and after the valve, comparing it to the recommended range. For detailed instructions on adjusting the pressure, refer to the manufacturer’s guidelines.
By adhering to these simple maintenance steps, you can ensure that your anti-siphon valve functions optimally, minimizing the risk of leaks. In turn, this will contribute to the prolonged lifespan of your valve and maintain the excellent condition of your plumbing system.
Comparison of Anti-Siphon Valve Types – Tabelle
| Type of Anti-Siphon Valve | Purpose | Installation | Maintenance | Common Applications | Cost | Regulations and Codes | Pros and Cons |
|---|---|---|---|---|---|---|---|
| Atmospheric Vacuum Breaker (AVB) | Prevents backflow by allowing air into the system when the pressure drops. | Typically installed above the highest outlet or fixture in the plumbing system. | Requires periodic inspection and cleaning to ensure proper functioning. | Residential irrigation systems, garden hoses, and outdoor faucets. | Relatively inexpensive compared to PVB and RPZ valves. | Meets the minimum requirements in many areas, but may not be suitable for all applications. | Easy to install and affordable, but may not provide adequate protection in some situations. |
| Pressure Vacuum Breaker (PVB) | Relieves pressure when backflow occurs, preventing water from flowing back into the potable water supply. | Installed below the highest outlet or fixture, and above the flood level rim of the connected equipment. | Needs regular testing and maintenance to ensure it is functioning correctly. | Residential and commercial irrigation systems, outdoor faucets, and swimming pools. | Moderately priced, depending on the brand and features. | Complies with most plumbing codes and regulations for residential and commercial use. | Effective in most residential and light commercial applications, but requires regular maintenance. |
| Reduced Pressure Zone (RPZ) Valve | Provides the highest level of protection by creating a physical barrier to prevent backflow. | Installed at the main water supply entry point, often requiring professional installation. | Requires annual testing and certification by a certified professional. | Commercial buildings, industrial facilities, and high-risk applications. | Typically the most expensive option due to its advanced design and installation requirements. | Required by law in many jurisdictions for specific applications. | Highest level of protection, but more expensive and requires professional installation and testing. |
9/11 Replacing Old Anti-Siphon Valves
Revitalizing Your Plumbing System: Recognizing and Replacing Old Anti-Siphon Valves In the intricate tapestry of your plumbing system, time can take its toll on even the most reliable components. The once steadfast anti-siphon valves may begin to falter, compromising efficiency and peace of mind. But fear not, for there are signs to heed and steps to take in order to restore the balance.
Firstly, be vigilant for leaks and drips that persist despite your best attempts at repair. These insidious trickles not only waste precious water but can also wreak havoc on your property, leaving behind a trail of destruction. Additionally, if your valves are constantly stuck or fail to function as intended, the consequences can be dire.
Reduced water pressure and blockages may plague your system, disrupting the gentle flow that keeps everything in harmony. Should you find yourself faced with the need to replace these weary valves, fear not, for a solution is at hand. Begin by gracefully shutting off the water supply and bidding farewell to any residual liquid that lingers within the system.
With utmost care, disconnect the old valves from their plumbing connections, freeing them from their weary duty. Their time has come to an end. Enter the stage, the new anti-siphon valve, ready to make its grand entrance.
Follow the instructions bestowed upon you by the manufacturer, for they hold the key to a seamless installation. Remember to tighten all connections securely, for the specter of leaks must be banished. As the final act draws to a close, let us take a moment to appreciate the benefits that lie in wait.
With the arrival of these new valves, plumbing efficiency shall be restored. Backflow shall be thwarted, and water shall be conserved through the reduction of leaks and the assurance of proper flow. By arming yourself with the knowledge to recognize the signs of decay and embarking upon the journey of replacement, you shall bestow upon your plumbing system the gift of optimal functionality.
Embrace this newfound efficiency and revel in the harmony it brings.

10/11 Additional Resources and Guides
To effectively address minor leaks in anti-siphon valves, it is crucial to take certain measures. Begin by shutting off the water supply to prevent further leakage and ensure your safety. One useful tip is to inspect the seals and gaskets of the valve.
Over time, they can deteriorate and cause leaks. If you notice any signs of wear or damage, replace them with new ones. Video tutorials are an excellent resource for repairing leaky valves.
They offer step-by-step guidance on disassembling the valve, identifying faulty components, and reassembling it correctly after repairs. Watching these videos can be especially beneficial for visual learners or those who prefer a hands-on approach. When searching for reliable manufacturers of anti-siphon valves , it is important to conduct thorough research.
Look for companies with a proven track record of producing durable , high-quality valves. Reading customer reviews and testimonials can provide valuable insights into the reliability and performance of different manufacturers. By following these tips, utilizing video tutorials, and selecting trustworthy manufacturers, you will be well-prepared to address minor leaks in anti-siphon valves and maintain a smoothly functioning plumbing system.

How to Fix a Leaky Anti-Siphon Valve: Step-by-Step Guide
- Inspect the anti-siphon valve for any visible signs of leaks, such as dripping water or moisture around the valve.
- If a leak is detected, gather the necessary tools for repair, including an adjustable wrench and plumber’s tape.
- Follow these steps to fix the leaky anti-siphon valve:
- Turn off the water supply to the valve by closing the main shut-off valve.
- Use an adjustable wrench to loosen the nuts connecting the valve to the water line.
- Apply plumber’s tape to the threads of the valve to create a watertight seal.
- Tighten the nuts securely to reattach the valve to the water line.
- Turn on the water supply and check for any remaining leaks. If the valve still leaks, consider replacing it.
11/11 Questions and Concerns
Do not let yourself be deceived by the misconceptions surrounding anti-siphon valve leaks. The cause may not always be a faulty valve; damaged pipes or fittings could be at fault. Additionally, not all leaks are visible to the naked eye – some may be hidden behind walls or underground.
Keep an eye out for abnormal water usage patterns or unexpected increases in your water bill as potential signs of a concealed leak. To effectively troubleshoot and diagnose specific valve issues, it is essential to understand how they operate. Low water pressure, inconsistent flow, or unusual noises could indicate a problem.
Familiarize yourself with the inner workings of the valve to better identify and address any issues that arise. If you find yourself in need of professional assistance, reach out to local plumbing companies or professional associations for recommendations. It is crucial to choose a licensed and experienced plumber who specializes in anti-siphon valve repairs to achieve the best possible results.
By dispelling misconceptions, acquiring troubleshooting knowledge, and seeking reliable assistance, you can confidently handle anti-siphon valve leaks. Remember, it is always wise to seek professional help when dealing with plumbing issues to prevent further damage.
If you’re struggling with a low water level in your toilet bowl, check out our article “Low Water Level in Toilet Bowl” for helpful tips and solutions to resolve this issue.
CONCLUSION
In conclusion, understanding the functionality, identification, and repair of anti-siphon valve leaks is crucial for maintaining a well-functioning plumbing system . By learning how these valves work and how to identify and address leaks, homeowners can save time and money on potential repairs. Remember to regularly maintain and replace old valves to prevent leaks in the future.
If you’re unsure about tackling a repair yourself, don’t hesitate to call a professional for assistance. We hope this article has provided valuable information and resources for addressing anti-siphon valve leaks. For more helpful articles on plumbing maintenance and repairs, be sure to explore our other resources.